
Building: building control inspections made simple
- Harper Latter Architects

- Dec 23, 2025
- 14 min read
Building control inspections are the official checks that make sure your project is built safely and to the standards set out in the UK Building Regulations. It’s a process that often gets confused with planning permission, but they are worlds apart. Planning is about whether you can build; building control is all about how you build it, ensuring every nut, bolt, and beam is up to scratch.
What Building Control Inspections Really Mean for Your Project
Think of a building control inspector as an impartial, expert eye on your project. Their job is to pop in at critical stages of the build—from the moment the diggers break ground for the foundations to the final lick of paint—to verify everything meets a strict set of national standards. This isn't just a box-ticking exercise; it's a non-negotiable legal requirement designed to keep you safe and ensure your home is built to last.
At its heart, the process is about safety, quality, and compliance. It confirms that the structure is sound, fire safety is properly handled, and the building is energy efficient. This independent verification is crucial, not just for your own peace of mind, but for the future value and legality of your property. Without that final completion certificate, trying to sell your home down the line can become a real headache. For a deeper dive into the specific rules, you can explore our detailed guide to Building Regulations compliance.
Choosing Your Inspection Route
When it comes to arranging inspections, you have two main options:
Local Authority Building Control (LABC): This is the team at your local council. They have a statutory duty to provide the service and come with a wealth of knowledge about the local area, ground conditions, and common issues.
Approved Inspectors: These are private firms or individuals authorised to carry out building control work. They can sometimes offer a bit more flexibility and a more hands-on, personalised service, which can be a real asset on complex projects.
The importance of this whole framework has been thrown into sharp relief in recent years, particularly with the national cladding crisis. By October 2025, of the 5,570 high-rise residential buildings identified with unsafe cladding, 1,946 (35%) had completed remediation, with many of those projects waiting on a final building control sign-off to be officially deemed safe. You can read the full government data release about building safety remediation efforts. It’s a stark reminder of just how essential these inspections are for public safety and for putting right the failures of the past.
Your Project's Journey Through Each Inspection Stage
Building control inspections aren't a one-off event. Think of them as a series of critical checkpoints spaced throughout your project, each one designed to sign off on a crucial phase of work before the next one begins. It’s a bit like an MOT for your build, but carried out in stages.
This step-by-step process is incredibly logical. It ensures vital elements like foundations or structural steelwork are checked and approved before they get covered up by the next layer of construction. Getting this sequence right gives everyone – you, your architect, and the local authority – the confidence that your home is being built safely and to the required standards. Miss a checkpoint, and you risk having to undo completed work, which is as costly as it is frustrating.
This simple diagram shows how the process flows, starting with the initial decision to build and moving methodically towards that final, all-important sign-off.
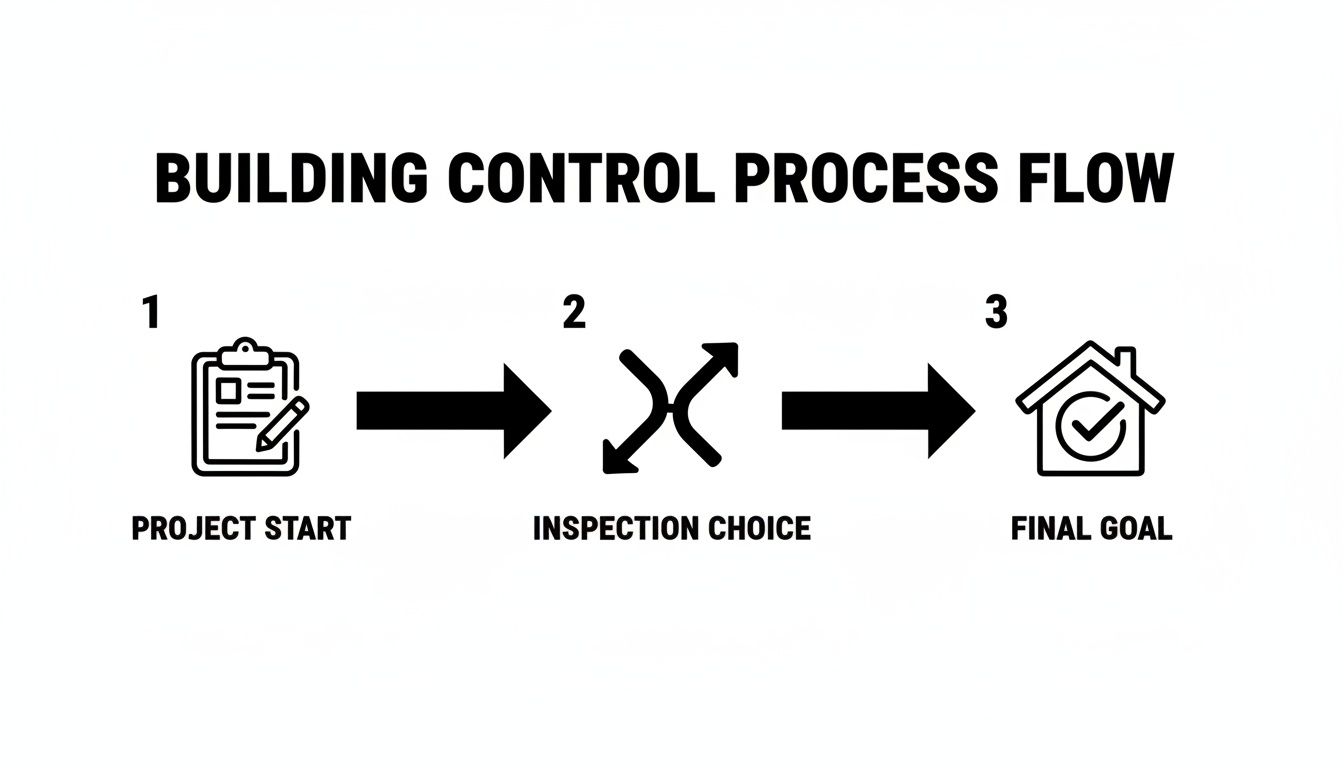
As you can see, each stage builds on the last, creating a clear and accountable path to a compliant, well-built home.
While every project is unique, most follow a fairly standard sequence of inspections. We've summarised the key stages in the table below, outlining what each check involves and when you need to get your inspector on site.
Typical Building Control Inspection Stages
Inspection Stage | Purpose of Inspection | When to Notify |
|---|---|---|
Commencement | Notifying the authority that work has begun on site. | At least 2 days before starting any work. |
Foundations | To check that ground conditions are suitable and excavations are correct before concrete is poured. | After digging foundation trenches, but before pouring concrete. |
Oversite | To inspect the hardcore, sand blinding, damp proof membrane, and any underfloor insulation. | Before laying the concrete ground floor slab. |
Drainage | To check that foul and surface water drainage pipes are laid correctly to the right falls. | After laying the pipework, but before backfilling the trenches. |
Superstructure | To inspect structural elements like steel beams, blockwork, wall ties, and roof timbers. | Before they are covered by insulation or plasterboard. |
Pre-Plaster | A final chance to see the 'bones' of the building, checking insulation and fire-stopping. | Once all structural work and insulation are complete, but before plasterboarding. |
Completion | A final, comprehensive check of the finished building for compliance. | When the project is fully completed. |
These stages form the backbone of the inspection process, ensuring that quality and compliance are woven into your project from the ground up. Let's look at what the inspector is really looking for at each key visit.
Foundations and Groundworks
The first site visit is often the most important. When the inspector arrives to check your foundation trenches, they're looking at one simple thing: is the ground you’re building on stable? They’ll check that the trenches are dug to the depth specified by your structural engineer and that the base is firm, without any soft spots, tree roots, or loose soil.
This is also the moment they’ll inspect the steel reinforcement cages (rebar) before any concrete goes in. It’s a non-negotiable check because once the concrete is poured, that steel is hidden forever. The inspector needs to verify the rebar is the correct size and positioned exactly as per the engineer's drawings to give the foundation its strength.
Damp Proof Course and Drainage
With the foundations in, the blockwork comes up to ground level. The next inspection focuses on keeping your home dry. The officer will check that the damp proof course (DPC) – a simple but vital waterproof membrane – is installed at the right height. It needs to be at least 150mm above the finished ground level to prevent moisture from the ground rising up into the masonry.
They will also take a close look at any drainage pipes laid below ground. They’re checking that the pipes have the correct gradient, or 'fall', so that waste flows away properly. They’ll also ensure the pipes are bedded on a material like pea shingle to protect them from being crushed. This work is just one small part of a much larger construction framework, which you can learn more about by reading our guide on what is the RIBA Plan of Work for UK homeowners.
Superstructure and Roof Timbers
As the walls climb higher and your home starts to take shape, the inspector will return to check the superstructure. This is their opportunity to examine the walls, floors, and roof structure before everything gets hidden behind plasterboard and finishes.
Key things they’ll be looking for include:
Wall ties: Making sure the inner and outer skins of a cavity wall are properly secured to each other for stability.
Structural openings: Checking that the lintels installed above windows and doors are the correct specification to carry the load above.
Roof timbers: Verifying the roof's timber frame has been built precisely according to the approved plans, ensuring it’s strong enough to support the tiles, wind, and even snow.
Pre-Plaster and Final Sign-Off
Just before the plasterboard goes on, the inspector conducts what’s known as a pre-plaster or pre-boarding check. This is the very last chance for anyone to see the inner workings of the building.
This inspection is vital for verifying that all insulation has been correctly and continuously fitted in walls and ceilings, and that fire-stopping measures are in place. Any gaps in insulation can create cold spots and compromise the building's energy efficiency.
Once all the work is finished, the inspector makes their final visit. They’ll run through a comprehensive checklist, looking at everything from the safety of the staircase and the effectiveness of ventilation systems to the placement of smoke alarms. If everything meets the regulations, you’ll be issued the coveted Completion Certificate. This is the official document that proves your project is fully compliant – a crucial piece of paper you’ll need if you ever decide to sell your home.
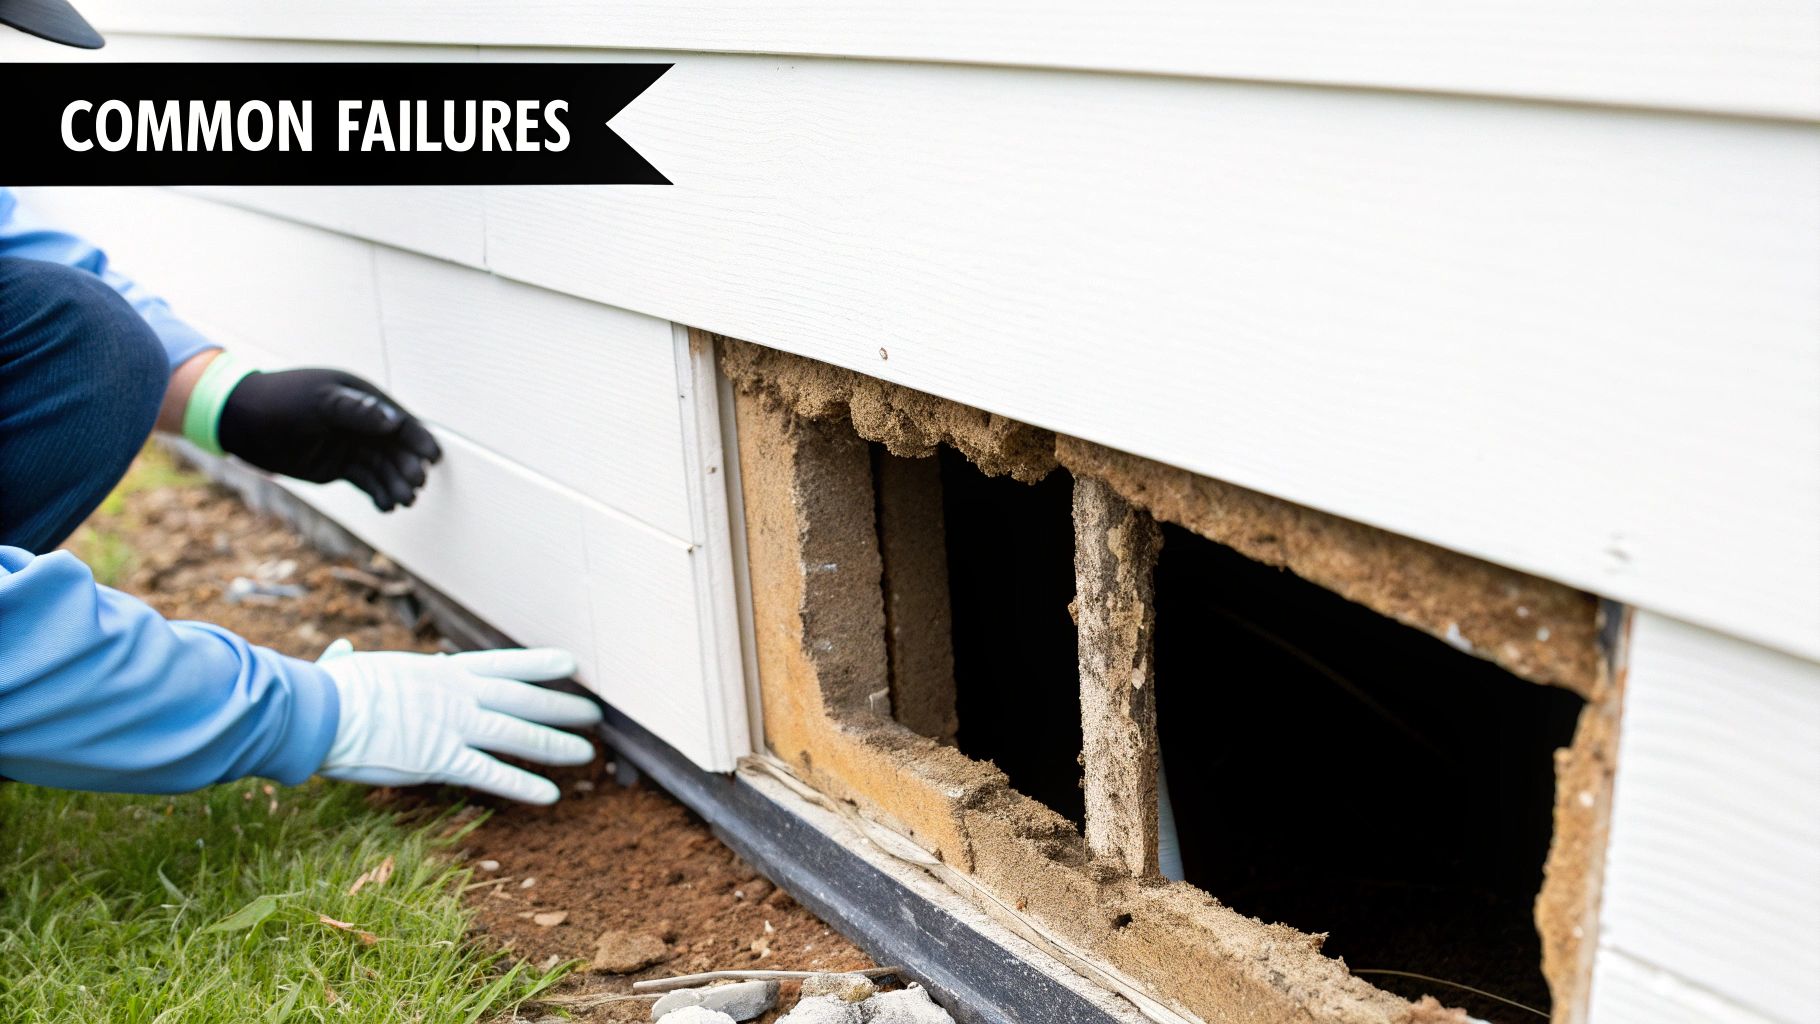
Why Inspections Fail and How to Avoid Common Pitfalls
Nothing brings a high-end refurbishment to a grinding halt faster than a failed building control inspection. It’s not just the delay that stings; it’s the unexpected cost and the sheer frustration of having to undo perfectly good work. The first step to making sure your project sails through is understanding exactly why inspections fail in the first place.
A failed inspection rarely comes down to a single, catastrophic mistake. It’s almost always the result of small, overlooked details that have been allowed to accumulate. These issues typically pop up where there's a disconnect between the architect's drawings, the builder's on-site execution, and the very specific requirements of the UK Building Regulations.
The secret to avoiding these headaches isn't rocket science. It's about proactive management and clear communication on site, long before the inspector even thinks about stepping through the door.
Unpacking Common Failure Points
While every project has its unique quirks, some issues crop up time and time again during building control inspections. These aren't just minor snags, either. They relate to the fundamental pillars of a safe, sound, and efficient home: safety, structural integrity, and thermal performance.
Here are three of the most common culprits we see:
Inadequate Fire-Stopping: This is a big one and a non-negotiable for safety. Inspectors will meticulously check that any gaps around pipes or cables passing through fire-rated walls and floors are sealed with the correct, certified materials. Using the wrong type of expanding foam or leaving even the smallest gap is an instant fail.
Poorly Installed Insulation: Gaps in insulation create 'thermal bridges', which are like little motorways for heat to escape your home. This not only wastes energy but can lead to cold spots that attract damp and mould. An inspector will look for a continuous, unbroken blanket of insulation, paying close attention to tricky junctions like window reveals and roof eaves.
Incorrect Drainage Gradients: A classic pitfall. Below-ground drainage has to be laid at a very specific, consistent fall to work properly. Too shallow, and you’re setting yourself up for future blockages. Too steep, and the liquid can outrun the solids, causing similar problems. It's common for inspectors to get a spirit level out to check this before the trenches are filled in.
It's crucial to understand that failures often happen even when the correct materials are on site. The issue is almost always in the application—a rushed installation or a misunderstanding of the manufacturer's instructions.
Proactive Steps to Ensure a Pass
Avoiding these common pitfalls is a team sport. It isn’t solely down to the builder; a well-prepared client and architect are just as vital to a successful outcome.
First, make sure that detailed construction drawings are always on site and, more importantly, are actually being used. These documents aren't just pretty pictures; they should specify the exact materials and installation methods required to meet Building Regulations.
Second, cultivate an atmosphere of open communication. Regular site meetings with your architect and builder are the perfect forum to review upcoming work and iron out any confusing details before they become expensive problems. A quick chat about how fire-stopping will be installed before the plasterboard goes up can prevent a world of pain later.
Finally, empower your team to ask questions. A builder who feels comfortable flagging a confusing detail with the architect is far less likely to make a bad assumption that results in a failed inspection. That simple shift in on-site culture can save thousands of pounds and weeks of delays.
Navigating Complex Inspections for Specialist Projects
While a standard extension might follow a well-trodden path for building control, high-value specialist projects are an entirely different ball game. They demand a far more rigorous and nuanced approach from inspectors.
Think about basement conversions, restorations of listed buildings, or large-scale renovations in South West London. The stakes are significantly higher, and the level of scrutiny rises to match. These projects throw up unique challenges that simply don’t exist on a typical build.
A basement extension, for instance, isn’t just about digging a hole. It's a major structural undertaking that requires meticulous oversight of waterproofing, ventilation, and fire escape routes. Likewise, any work on a period property, especially in a conservation area, adds another layer of complexity that inspectors take very seriously.
The Unique Demands of Listed Buildings
When you're renovating a listed building, the building control inspector’s role expands. They don’t work in a vacuum; instead, they collaborate closely with the local authority’s conservation officer. This partnership is crucial to ensure any modern upgrades needed for safety and efficiency are handled in a way that respects the building's historic character.
The whole focus shifts to sensitive integration. Upgrading insulation or installing a modern fire suppression system has to be done with methods and materials that don't damage or compromise the original fabric of the building. It’s a delicate balancing act that often involves specialist techniques and detailed justifications to get both the inspector and the conservation officer on board. Every single decision is carefully weighed to protect the architectural heritage.
For these high-stakes projects, a bulletproof structural engineering plan is non-negotiable. An inspector will meticulously cross-reference the engineer’s calculations and drawings with the work being carried out on site, especially during major alterations to the building's frame.
Subterranean Scrutiny and Fire Safety
Basement conversions are hugely popular in London, but they come with specific risks that draw an inspector's intense focus. The most critical element, without a doubt, is the waterproofing (or tanking).
An inspector will need to see that the waterproof membrane is installed perfectly—no punctures, no poorly sealed joints—before it gets covered up. A failure here is nothing short of catastrophic. It leads to damp, serious structural issues, and incredibly costly remedial work down the line.
Furthermore, advanced fire safety systems like sprinklers or misting systems are often mandatory in larger or more complex homes. Inspectors will verify that these systems are designed and installed by certified professionals and meet all relevant British Standards. They check everything from the pipework and pressure to the final commissioning certificate.
Understanding these heightened requirements is a core part of project planning, which is also a key consideration under health and safety rules. To better understand your duties, read our concise guide on when CDM regulations apply to your construction project.
For the most complex projects, oversight is now managed by the Building Safety Regulator (BSR), established under the Building Safety Act 2022. By October 2025, the BSR was tracking 152 new build applications covering thousands of homes, highlighting the scale of its regulatory role. This new level of governance underscores the importance of getting compliance right from day one. You can learn more about the BSR's building control approval data on the GOV.UK website.
Your Practical Checklist for a Smooth Inspection Day
A successful building control inspection isn’t just about the quality of the work itself; it’s about presenting it in an organised, professional way. A smooth site visit really hinges on being prepared, making sure the inspector can quickly and efficiently verify that everything complies with the regulations.
Failing to get ready can lead to simple misunderstandings, frustrating delays, or even a failed inspection that stalls your entire project. This straightforward checklist is a practical framework for you, your architect, and your builder to follow, helping make every inspection day as stress-free as possible.

Before the Inspector Arrives
Good organisation begins long before the inspector’s van pulls up. Getting the groundwork right in the days leading up to the visit sets a professional tone and shows a genuine commitment to compliance.
Confirm the Visit: Always double-check the appointment with your building control body at least 48 hours in advance. It’s a simple step, but it prevents any last-minute scheduling mix-ups and keeps everyone on the same page.
Review the Scope: Have a quick chat with your site manager or builder to clarify exactly what’s on the agenda for inspection. You need to be certain the relevant work is 100% complete and ready for sign-off, not just mostly finished.
Gather Your Documents: This is probably the most critical part of your prep. An inspector needs to see the evidence that backs up the physical work. Having everything laid out and ready saves a huge amount of time and proves your diligence.
Essential On-Site Documentation
Your site office, or even just a designated clean table, should have a dedicated file with all the relevant paperwork, ready to go. Trying to find a structural calculation on a muddy phone screen is a recipe for a frustrating and drawn-out visit.
The goal here is to make the inspector's job as straightforward as you possibly can. Presenting clear, organised documentation shows that you're managing the project professionally and have nothing to hide.
Key documents to have on hand include:
Approved Drawings: A full, clean set of the Building Regulations drawings that the inspector is actually working from.
Structural Calculations: All the relevant calculations from your structural engineer, especially for things like foundations, steel beams, or new roof structures.
Product Specifications: Keep the manufacturer’s data sheets for key materials like insulation, fire-stopping products, or damp-proof membranes. This proves you’ve used the correct, specified items.
Certificates: Have any relevant certificates—for electrical work or boiler installations, for example—filed and ready for review.
Preparing the Site Itself
Finally, the physical state of the site speaks volumes. A safe, accessible area allows the inspector to focus entirely on the quality of the construction, which is exactly what you want them to be doing.
Make sure the work area is clean, tidy, and free of any unnecessary hazards. You’ll need to provide clear and safe access to the specific elements being inspected, whether that means having a stable ladder ready for a roof inspection or clearing materials away from a new drainage run. A tidy site is a safe site, and it’s a clear sign of a well-managed project.
Understanding Inspection Costs and Project Timelines
Two questions always come up right at the start of any project: how much will this cost, and how will it affect my schedule? Budgeting for building control inspections isn't just about a one-off fee; it’s a crucial part of your financial and logistical planning that unfolds over several stages.
The cost is usually split into two parts. First, you have the plan checking fee, which you'll pay when your architect submits the detailed drawings for review. After that comes the inspection fee, covering all the necessary site visits as the build progresses.
For a typical high-end extension in South West London, you can expect the total building control fees to be somewhere in the region of £400 to £1,000+. This figure can climb depending on the project's complexity, its total value, and whether you opt for the Local Authority or a private Approved Inspector.
How Timelines Are Affected
The real impact on your timeline isn't just the few hours an inspector spends on-site. It's about working around the statutory notification periods. You’re legally required to give your inspector a heads-up at key stages—for instance, giving at least 24 hours' notice before you pour the concrete for the foundations.
A failed inspection is one of the biggest risks to your project timeline. If an inspector finds something that isn't compliant, they’ll issue a notice to fix it. This effectively stops all work in that area until the problem is sorted and a re-inspection is passed.
These potential hold-ups are why choosing a competent and well-resourced inspection service is so important. The reality is, many UK local authority building control departments are under immense pressure. As of 2025, over 50% of building control surveyors were in their 50s, and with private sector salaries often being more competitive, it’s creating staff shortages that can slow things down.
The East Cambridgeshire Building Control Service Delivery Plan for 2025-2026 gives a good insight into the challenges many councils are facing. Factoring in potential delays and picking a responsive inspector from the outset are critical moves for keeping your project on track.
A Few Common Questions
What’s the Difference Between Planning Permission and Building Regulations?
This is a classic point of confusion, and it’s a crucial one to understand. Think of it this way: Planning Permission is about the principle of your project – its size, appearance, and impact on the neighbourhood. It asks, "Are you allowed to build this here?"
Building Regulations, on the other hand, are about the technical side of things. They focus on how the structure is built, ensuring it’s safe, healthy, and energy-efficient. Building Control asks, "Is this built correctly?" You’ll almost always need both for a major project.
What Happens if I Don’t Get Building Control Approval?
Put simply, skipping this step is illegal. The local authority has the power to serve an enforcement notice, which could force you to pull down or alter the work at your own expense.
Beyond the immediate legal headaches, you’ll face major problems when you try to sell your home. No completion certificate means no proof of compliance, which is a huge red flag for any potential buyer and their mortgage lender.
How Long Does a Final Completion Certificate Last?
Good news here – a completion certificate doesn’t have an expiry date. It’s a permanent record confirming that, at the time of inspection, the work met the required standards.
Treat this document like gold. You’ll need to keep it in a safe place, as it will be essential for any future sale of the property.
Navigating the world of building regulations is a fundamental part of any high-end residential project. If you’re planning a refurbishment, extension, or new build in South West London, our team at Harper Latter Architects can provide the expert guidance needed to bring your vision to life, correctly and compliantly.
Learn more by visiting us at https://harperlatterarchitects.co.uk.
Comments