
How to Waterproof a Basement: Your Easy Guide
- Harper Latter Architects

- Aug 24, 2025
- 16 min read
At its core, waterproofing a basement is about creating a robust barrier that stops water in its tracks. This is usually done with an exterior membrane that wraps the foundation or a clever interior drainage system that manages any water that gets in. A truly effective approach on how to waterproof a basement space, however, is a combined one: sealing cracks, managing groundwater with drains, and making sure your home's guttering and land grading are actively channelling rainwater away from the foundations.
Why Basement Waterproofing is Crucial for UK Homes
A damp, musty basement is more than just an unpleasant space—it's a red flag. It’s a clear warning of water ingress that can slowly but surely compromise your home’s structural integrity and chip away at its value.
Here in the UK, our notoriously wet weather means subterranean spaces are in a constant battle against moisture. This isn't just about the odd puddle after a heavy downpour. It's about the relentless hydrostatic pressure—the sheer force of groundwater pushing against your foundation walls and floor, day in and day out.
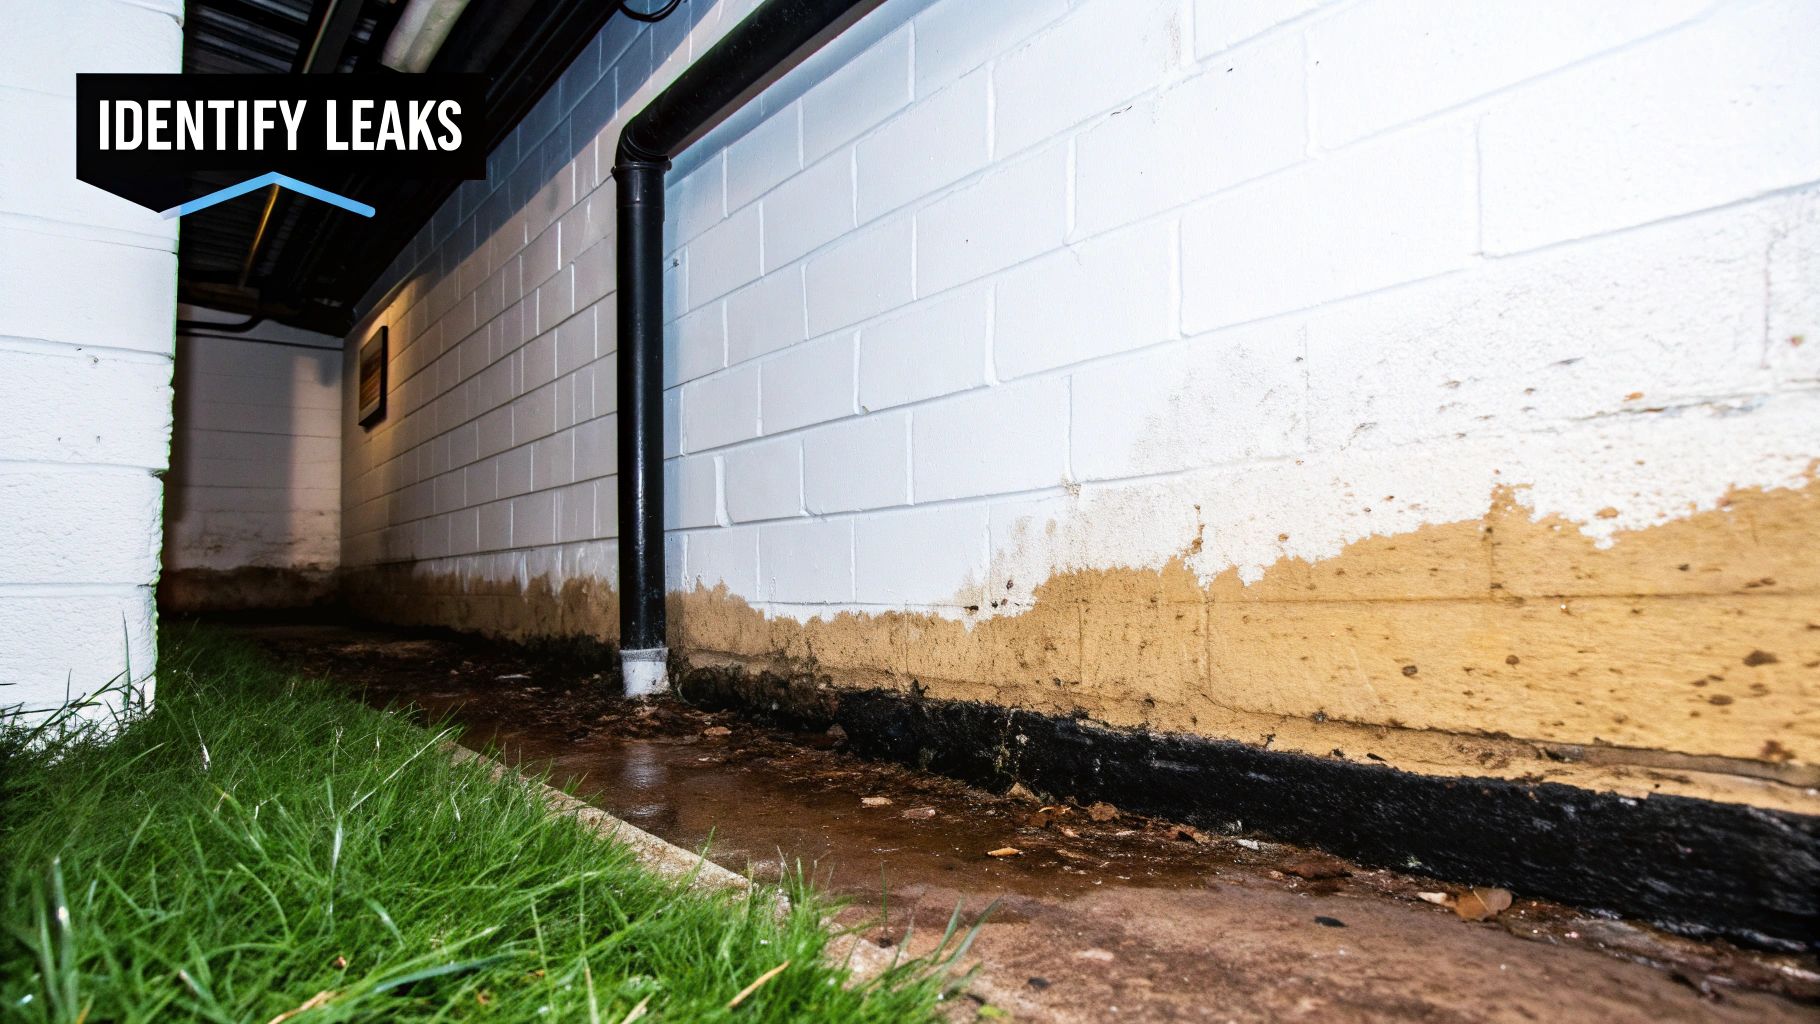
This constant pressure finds and exploits every tiny crack or weak point, leading to a slow, steady creep of water that causes serious damage over time. Older properties, with their traditional brick or stone foundations, are especially vulnerable to this sort of attack.
Spotting the Early Warning Signs
Learning to recognise the subtle signals of a damp problem is key. It allows you to step in before a minor issue spirals into a major structural repair. Keep a sharp eye out for these tell-tale signs:
Efflorescence: A chalky, white powder that appears on brickwork or concrete. It’s the mineral salt deposits left behind as moisture evaporates from the surface.
Musty Odours: A persistent damp, earthy smell that never quite leaves. It's a dead giveaway for mould or mildew, even if you can't see it yet.
Damp Patches: Dark, discoloured areas on walls or floors that often feel cold or damp when you touch them.
Peeling Paint or Flaking Plaster: When moisture pushes through the walls, it forces paint to bubble and causes plaster to crumble and deteriorate.
Ignoring these symptoms is a gamble. You’re allowing moisture to weaken timber supports, corrode metal fittings, and provide the perfect breeding ground for unhealthy mould.
Tackling damp at its source is an investment, not just a repair. A professionally waterproofed basement doesn't just protect your home's foundation; it improves indoor air quality and unlocks valuable living or storage space, which can significantly increase your property's market value.
The Growing Need for Dry Subterranean Space
The demand for functional, dry basements has never been higher. This is particularly true in crowded urban areas where extending outwards or upwards simply isn't an option.
As a result, basement waterproofing has become a rapidly growing sector. Homeowners are looking to create everything from home cinemas and gyms to entire guest suites below ground. In fact, planning applications for basement extensions have shot up by 183% in recent years, showing just how strong the trend towards subterranean living is. CSG Talent offers more insights on the UK's move underground.
Ultimately, understanding how to waterproof a basement properly begins with recognising just how necessary it is. It's about transforming a vulnerable, often-neglected area into a secure, dry, and valuable part of your home.
Choosing Your Waterproofing Strategy: Inside vs Outside
When it comes to keeping your basement dry, you’re faced with a fundamental choice: do you tackle moisture from the inside, or do you stop it at the source on the outside? Think of it as either managing the water once it’s arrived or building an impenetrable fortress to keep it out altogether.
Each strategy has its place, and the right one for your home depends on everything from its age and construction to your budget and tolerance for disruption.
Evaluating Interior Waterproofing Systems
An internal waterproofing system is best thought of as a water management solution. It cleverly accepts that some water might get through the structure, especially in older buildings, and gives it a controlled path to exit harmlessly.
The gold standard here in the UK is the cavity drain membrane system. We’re essentially lining the internal walls and floor with a dimpled plastic sheet. Those dimples create a small air gap, or ‘cavity’, that lets any water seeping through the wall trickle down behind the membrane. It’s then collected in a hidden drainage channel around the perimeter of the room.
This channel usually guides the water into a sump pump, a clever device that automatically pumps it away from your home. The beauty of this system is that it works with the water pressure, not against it, making it incredibly reliable for existing properties.
You might also come across waterproof renders or coatings that are applied directly to the internal walls. While they can work for minor damp patches, they’re not really a match for serious hydrostatic pressure.
Understanding Exterior Waterproofing Methods
If you want the most robust, belt-and-braces approach, exterior waterproofing is the answer. It’s a preventative measure designed to stop water from ever touching your foundation walls in the first place.
This is a far more intensive job, as it involves excavating all the earth from around your home’s foundations to expose the external walls.
Once clear, the walls are thoroughly cleaned, any cracks are repaired, and a waterproof membrane is applied. This is typically a liquid-applied polymer or a self-adhesive sheet that creates a seamless, watertight barrier—a process known as tanking. A protective drainage board is often placed over the top before the soil is backfilled.
This method tackles the problem head-on, relieving the constant pressure that groundwater exerts on your basement walls. It’s a significant undertaking, but it delivers unparalleled peace of mind. For new builds or high-value renovations, it’s often the preferred route. When you're planning ambitious projects like luxury basements, integrating this level of structural protection from the outset is non-negotiable.
The decision between interior and exterior waterproofing is not just about cost—it's about choosing the right defence for the specific type of threat your property faces. Interior systems manage water ingress efficiently, while exterior systems aim for total prevention.
Making the Right Choice for Your Property
So, which is the best way to waterproof your basement? It really comes down to the specifics of your project.
An internal cavity drain system is almost always less disruptive and more cost-effective. This makes it an ideal choice for retrofitting into existing homes, especially older, listed, or terraced properties where external excavation just isn’t feasible.
On the other hand, an exterior system is the ultimate long-term solution. While the upfront cost and disruption are much higher, it’s the definitive way to stop water ingress. It’s the go-to method for new construction or during major renovations where the groundworks are happening anyway.
In some high-risk situations, a hybrid approach can offer the best of both worlds. Combining an exterior membrane with an interior sump pump provides a multi-layered defence, ensuring your basement stays bone-dry, come what may.
To help you weigh the options, here's a direct comparison of the two main approaches.
Comparing Interior and Exterior Waterproofing Methods
This table breaks down the key differences between the two primary waterproofing philosophies, giving you a clearer picture of which might be the best fit for your property's needs and your project's scope.
Method Feature | Interior Waterproofing (e.g., Cavity Drain Membrane) | Exterior Waterproofing (e.g., Tanking) |
|---|---|---|
Primary Goal | Manages water that enters the structure | Prevents water from ever reaching the structure |
Disruption Level | Low to moderate; all work is done inside | High; requires full excavation around the foundation |
Typical Cost | Lower initial investment, often ranging from £5,000 to £10,000 | Higher investment, often £10,000 to £20,000+ |
Best For | Existing homes, listed buildings, and retrofitting projects | New builds, major renovations, or severe water pressure issues |
Effectiveness | Highly effective at managing water and relieving pressure | Extremely effective at creating a permanent waterproof barrier |
Ultimately, the choice depends on a professional assessment of your property’s specific vulnerabilities, your budget, and the level of protection you want to achieve.
Installing an Interior Cavity Drain System
When digging up the garden simply isn’t an option, an interior cavity drain system offers a brilliant and far less disruptive solution. This clever method doesn’t waste energy trying to hold back the immense force of water pressure. Instead, it accepts that water might find a way in and intelligently manages it, channelling any seepage safely away from your home. It's the go-to method for retrofitting waterproofing into existing UK properties, especially for period homes or those on tight urban plots where excavation is impossible.
At its core, the system creates a small, controlled gap between the damp structural wall and your new interior finish. Any moisture that gets through the old wall simply runs down inside this cavity, where it is caught by a drainage channel at the base and quietly pumped away. The beauty of this approach is that it relieves hydrostatic pressure rather than fighting it, guaranteeing a permanently dry space.
The entire process is methodical, designed to turn a damp, forgotten cellar into a warm, habitable part of your home—all without touching the landscaping outside. It starts, as all good jobs do, with thorough preparation.
Preparing the Walls and Floor
Before a single sheet of membrane goes up, we need to get the existing walls and floor ready. This isn't about making them look pretty; it's about making sure the surfaces are sound and free of anything that could damage the new system. We hack off any loose or crumbling plaster and knock off any sharp bits of brick or concrete that could puncture the membrane down the line.
It's also the right time to tackle any major cracks or holes. While the cavity drain system is built to handle water, filling large voids with a good mortar mix adds a bit of structural support and stops water gushing into the cavity during a downpour. This groundwork ensures the membrane sits snugly against the wall, creating that crucial, consistent drainage gap.
Fitting the Dimpled Membrane
With the walls prepped, it's time to install the cavity drain membrane. This is a tough, high-density polyethylene sheet covered in dimples, which are what create that all-important air gap. The membrane is fixed directly to the walls with special sealed plugs, which we drill straight into the brickwork.
Getting the sheets fitted correctly is where the skill comes in. Each panel needs to overlap the next by a few dimples' width, and we seal the joins with waterproof tape to create one continuous, integrated barrier. The aim is to make sure any water coming down the wall is funnelled perfectly behind the membrane and down towards the floor, with no chance of it sneaking into the room. It’s this attention to detail that makes the system so reliable.
The real intelligence of a cavity drain system lies in its acceptance of water. Instead of attempting a futile battle against immense hydrostatic pressure, it redirects the water's energy, channelling it into a manageable and controlled pathway out of the property.
Installing Drainage Channels and the Sump Pump
Once the walls are covered, we install a drainage channel around the entire edge of the basement floor. This purpose-built conduit sits in a shallow trench we cut into the floor slab. We lay it with a slight fall to encourage the water to flow towards one collection point. The floor membrane is then laid over the old floor and tucked neatly into the top of this channel.
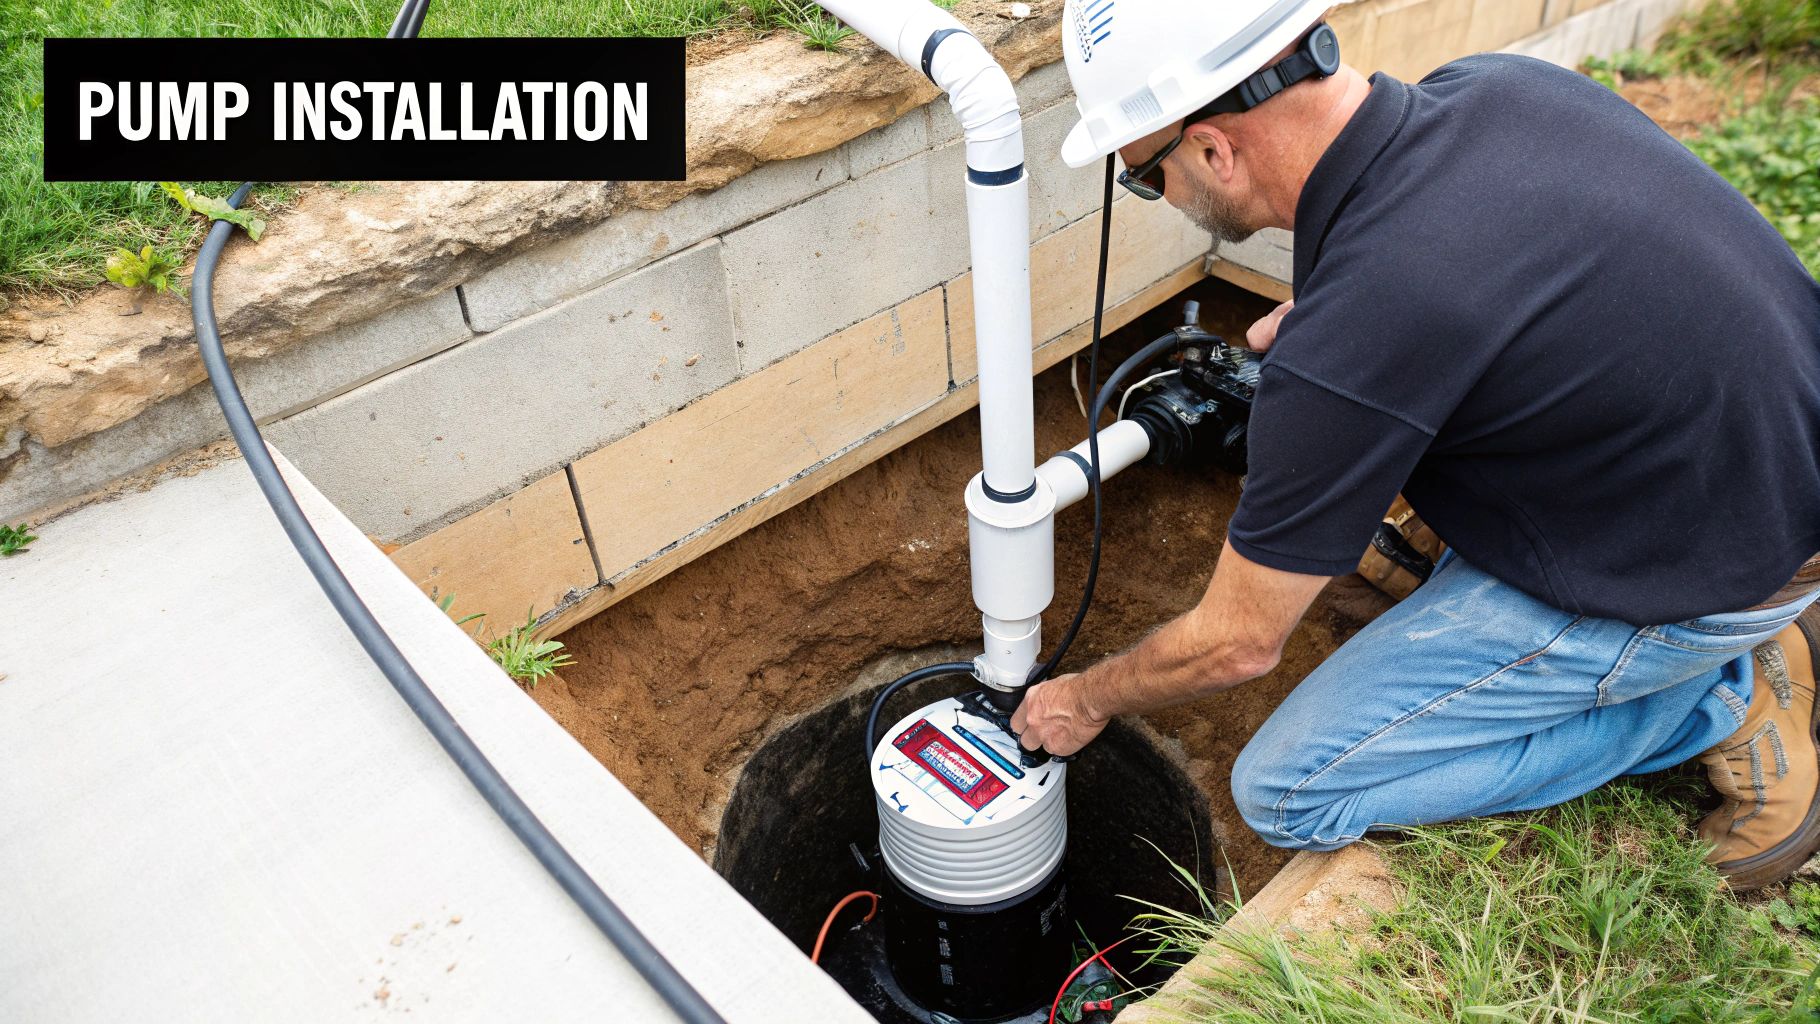
Every drop of water collected by the membranes flows into this perimeter channel and makes its way to the engine room of the system: the sump pump. This unit lives in a chamber set into the floor and holds a submersible pump fitted with a float switch.
Automatic Operation: As the water level in the chamber rises, the float switch kicks the pump into action, pushing the water out through a pipe to an external drain, well away from the house.
Battery Backup: For complete peace of mind, any quality installation should include a battery backup. This is non-negotiable. It keeps the pump running during a power cut, which, ironically, often happens during the very storms that cause the worst water problems.
High-Level Alarm: A high-level water alarm is another essential safety net. It sounds an alert if the water in the sump chamber gets too high, warning you of a potential pump failure or blockage long before it becomes a real issue.
This interior system works hand-in-hand with exterior drainage principles, which aim to reduce the amount of water reaching your foundations in the first place.
As you can see, diverting groundwater before it builds up pressure is always the first line of defence in a truly robust waterproofing strategy.
With the full system installed and thoroughly tested, the final stage is to put the room back together. You can fix plasterboard directly to the membrane plugs or build a block wall in front of it, ready for plastering and decorating. The result is a perfectly dry, warm, and comfortable room, with the entire water management system working silently behind the scenes.
Taking on an Exterior Waterproofing Project
When you need the ultimate defence against water getting in, nothing beats a full exterior waterproofing system. This approach is the definitive answer to serious hydrostatic pressure, creating a seamless, impermeable barrier that stops groundwater from ever touching your foundation walls. It’s a major undertaking, best suited for large-scale renovations or new builds, but the peace of mind you get from a permanently dry, secure basement is second to none.
Unlike interior systems that only manage water after it’s already seeped through, an exterior project is purely preventative. It involves excavating all the soil around your property to expose the foundation, applying a seriously robust waterproof membrane, and installing a modern drainage system. This method tackles the problem at its source, offering a complete, long-term solution.
The Critical Excavation Phase
The first and most disruptive part of the job is the excavation. We have to dig a wide trench around the entire perimeter of your home, going all the way down to the footings—the very base of the foundation. This is heavy-duty work that calls for professional machinery and meticulous planning to avoid hitting any underground utilities like gas lines or water mains.
Safety is absolutely paramount here. The walls of the trench need to be properly shored up to prevent any risk of collapse, which is a real concern with the UK’s notoriously unpredictable weather. It's an intensive stage, but it's essential. Without clear, safe access to the foundation walls, the rest of the job simply can’t be done right.
Preparing the Foundation Walls
Once the foundation walls are exposed to the open air, they need a thorough prep before any waterproofing products can go on. After years buried underground, they’ll be caked in soil and debris. The first step is to pressure wash them, removing every last trace of dirt to ensure the new membrane can bond perfectly.
This is also our chance to give the foundation a detailed inspection. We’re looking for any cracks, holes, or weak mortar joints that need attention.
Crack Repair: Any structural cracks are chased out, cleaned, and filled with hydraulic cement or an epoxy injection. These materials are brilliant because they expand as they cure, creating a watertight seal that's often even stronger than the original concrete.
Surface Smoothing: If the surface is rough or uneven, we’ll apply a render or parge coat to create a smooth, uniform finish. A seamless surface is crucial for the integrity of the membrane.
You can’t cut corners on preparation. Applying a membrane over a dirty or damaged wall is just asking for trouble; it will eventually peel or blister, compromising the entire system.
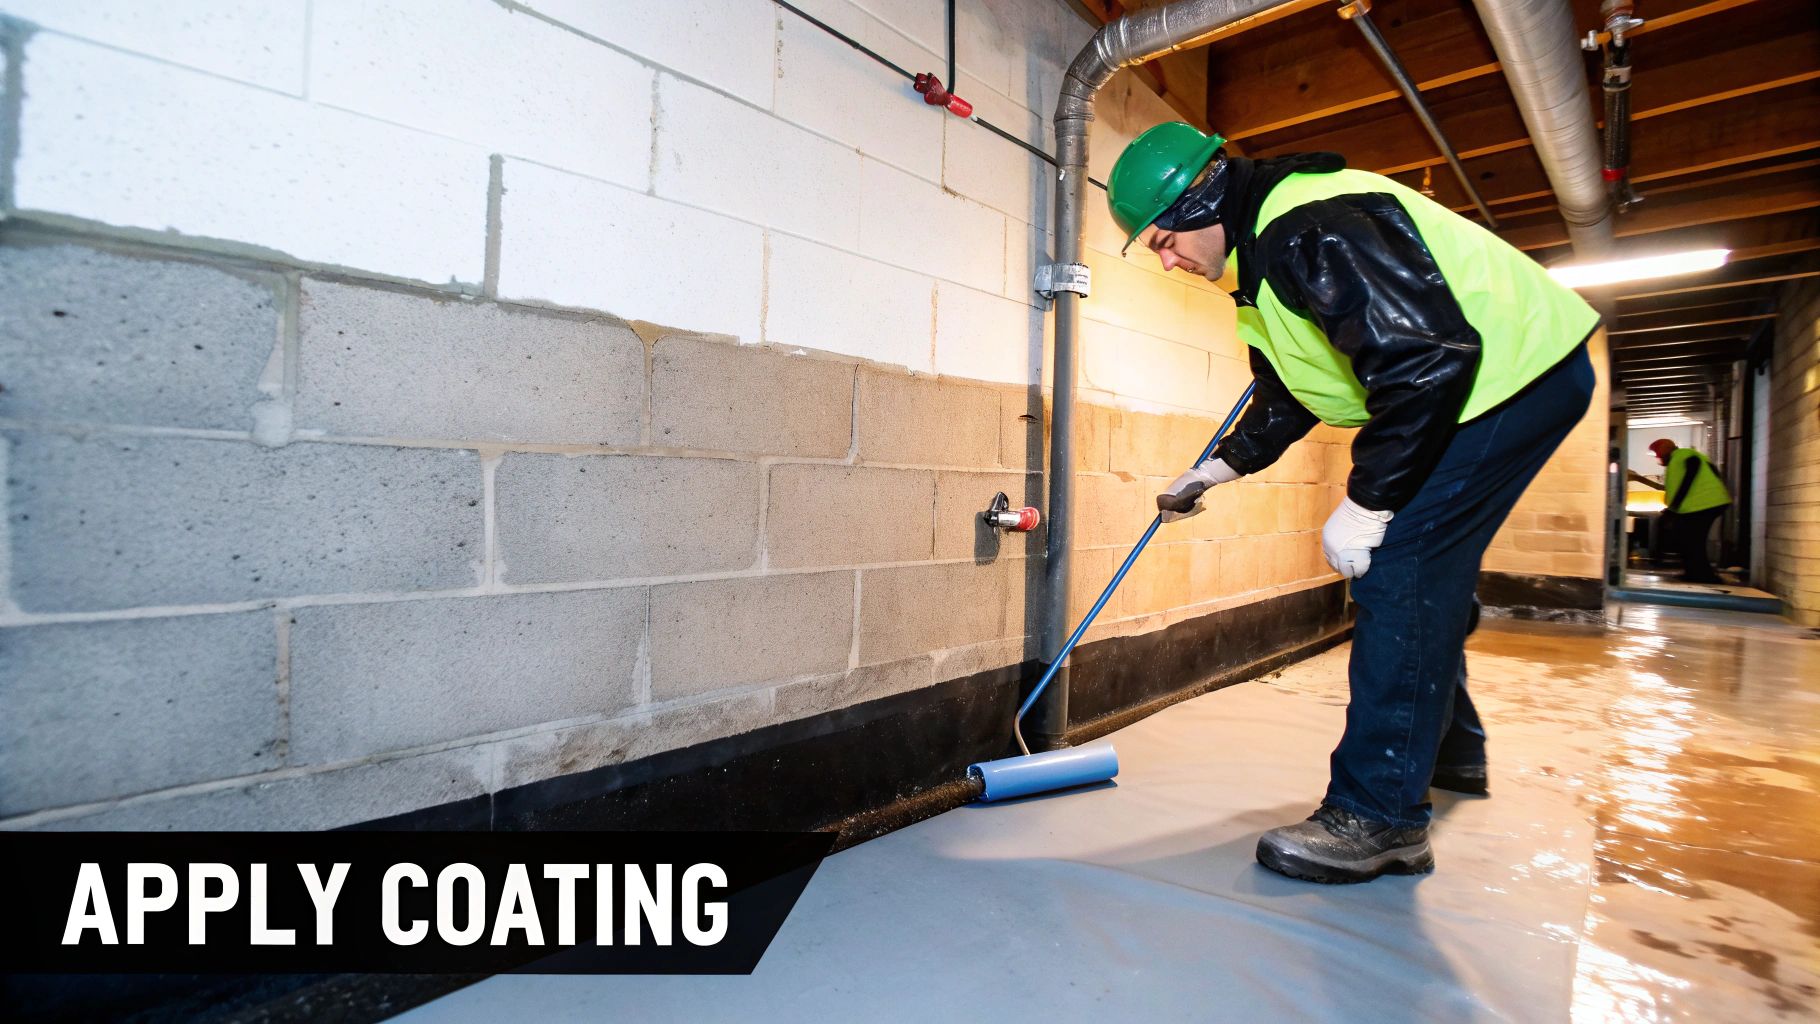
Applying the Waterproof Barrier
With the walls clean, repaired, and smooth, it’s time to apply the primary waterproof barrier. The aim is to create a continuous, seamless membrane that completely wraps the foundation from the footings right up to ground level.
A top choice for high-end projects is a polymer-modified bitumen coating. This is a thick, liquid-applied product that we spray or roll onto the wall. As it cures, it forms a tough yet flexible rubber-like layer that can bridge small cracks and move with the building without splitting. We often apply several coats to build up the required thickness for a guaranteed watertight seal.
An exterior waterproofing system is like giving your home's foundation a bespoke-fitted raincoat. It's not just about repelling water; it's about creating a comprehensive shield that protects the very structure of your property from the relentless pressure of the surrounding earth.
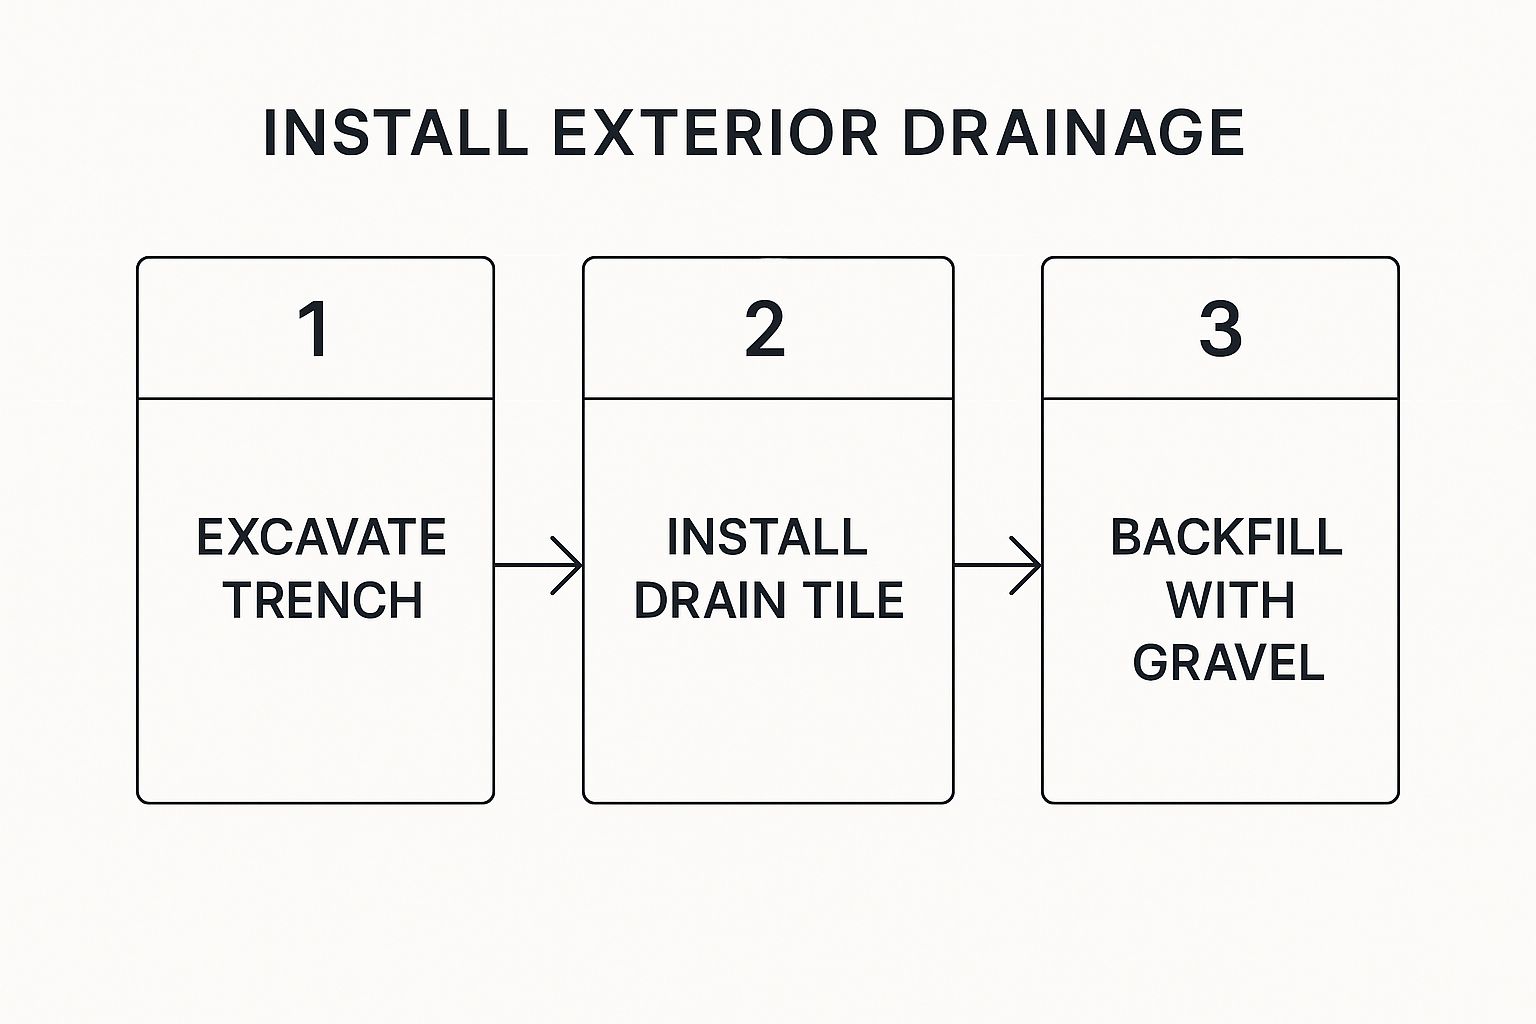
Installing Drainage and Protection
The membrane is just one part of the solution. We also need to manage the water in the surrounding soil to relieve that hydrostatic pressure. The best way to do this is by installing a modern French drain (or footing drain) at the base of the foundation. We lay a perforated pipe in a bed of clean gravel at the bottom of the trench, designed to collect groundwater and channel it safely away to a sump pump or another suitable discharge point.
Finally, before we can backfill the trench, we fix a dimpled drainage board over the new waterproof membrane. This tough plastic sheet does two very important jobs:
Protection: It acts as a shield, protecting the delicate membrane from being punctured by rocks or sharp objects when we put the soil back.
Drainage: The dimples create a small air gap against the wall, allowing any water in the soil to drain freely down to the French drain, further reducing pressure.
Once these layers of defence are in place, the trench is carefully backfilled—usually with gravel closest to the wall to aid drainage, followed by the original soil. The ground is then compacted and graded to slope away from your home. This completes a truly robust system for waterproofing your basement from the outside in.
Budgeting for Your Basement Waterproofing Project
Knowing how to waterproof a basement is one thing, but figuring out the financials is where the project really starts to take shape. A clear, realistic budget is your best defence against unexpected costs and ensures you can afford a high-quality, lasting solution without having to cut corners.
The final bill for waterproofing is rarely a single, simple figure. It’s shaped by a mix of factors, from the sheer size of your cellar to the technical complexity of the system you choose. Applying a liquid coating to a small, sound wall will, of course, cost a fraction of installing a full cavity drain membrane system with twin sump pumps in a sprawling, structurally compromised basement.
Key Cost Factors to Consider
Several key elements will dictate the overall expense. The size of your basement is the most obvious multiplier—a larger footprint means more materials and more labour. The current condition of the space is just as critical. A basement with crumbling walls, active leaks, or deep-seated mould will demand a lot of prep work before the real waterproofing can even begin.
The type of system you select also plays a huge role in the final cost. For instance:
Liquid Coatings: Often the most budget-friendly choice for tackling minor damp, but they just aren't up to the job for dealing with significant water pressure.
Cavity Drain Membranes: A more substantial investment, this system involves membranes, drainage channels, and a sump pump. It's a robust and highly reliable solution for most situations.
Exterior Tanking: This is usually the most expensive route due to the heavy excavation work needed, but it provides the ultimate barrier against water getting in from the outside.
The goal of budgeting isn't just to find the cheapest price; it's to secure the best value. Investing in a properly specified and professionally installed system prevents far costlier repairs and structural damage in the future.
Estimating Typical Waterproofing Costs
So, what should you really expect to pay? In the UK, the cost of waterproofing a basement generally falls somewhere between £100 and £120 per square metre. Think of this as a starting point. Figures can dip as low as £40 for very basic work or climb past £250 per square metre for complex projects with high-end finishes and extensive structural repairs.
Labour is a massive part of that final price, especially for disruptive jobs like digging drainage channels into a concrete floor or excavating around your foundations. A professional team brings experience, specialised equipment, and, crucially, an insured guarantee for their work—an invaluable part of your investment.
Where You Can Save and Where You Shouldn't
It can be tempting to try a DIY approach to save on labour costs, but for anything more than sealing a minor crack, this is a false economy. A failed waterproofing system doesn't just need re-doing; it can lead to catastrophic damage to your home and belongings.
The real savings come from smart planning.
If you’re already planning a major refurbishment or a home extension, it’s much more cost-effective to roll the waterproofing work into that larger project. Similarly, if you're converting the basement into a habitable space, you’ll need to meet building regulations and might even need planning permission. You can check out our guide on navigating basement extension planning permission to get a handle on those requirements. This kind of integrated approach prevents doing the same work twice and keeps the whole project running smoothly.
Long-Term Care for Your Dry Basement
A professionally installed waterproofing system is a robust defence, but it isn't a ‘fit and forget’ solution. Think of it less like a permanent fixture and more like a high-performance engine for your home; it needs a little routine upkeep to keep everything running smoothly.
This proactive approach is all about protecting your investment and ensuring your dry basement stays that way for decades. A simple maintenance schedule helps you spot minor issues before they ever have a chance to escalate, prolonging the life of your system and safeguarding your property’s value.
Creating a Simple Maintenance Schedule
Regular checks are surprisingly straightforward and don't require any specialist tools. The most crucial component to keep an eye on is your sump pump, which is the heart of any interior drainage system.
We always recommend an annual professional service. A specialist will inspect the pump's motor, clean out the impeller, and test the float switch and battery backup. It's the best way to be certain everything is ready to perform when the next downpour hits.
Think of your waterproofing system's maintenance as a long-term insurance policy for your home's structural health. Consistent care ensures it operates at peak efficiency, preventing costly emergency repairs down the line and contributing to a healthier living environment.
Between those professional visits, there are a few simple checks you can carry out yourself:
Quarterly Sump Pit Inspection: Carefully lift the lid and clear out any silt, gravel, or debris that might have collected at the bottom. This prevents blockages that could easily jam the pump when you need it most.
Bi-annual Pump Test: This one is easy. Just pour a bucket of water into the sump pit until the float rises. The pump should kick in automatically, drain the water, and then switch itself off.
Visual Checks: Every so often, take a quick look around. Check for any new signs of dampness along the walls or floor, paying close attention to corners and joints where issues can first appear.
This consistent attention to detail is part of a holistic approach to home maintenance. You can discover more about creating a healthier and more resilient home in our **UK energy-efficient home design guide**. It’s clear that more homeowners are realising the importance of durable protection, as the UK market for basement waterproofing coatings continues to grow. You can explore more on this trend and its impact on the global basements waterproofing coating market.
Your Questions Answered
When it comes to waterproofing a basement, homeowners often have similar questions. Let's clear up a few of the most common ones to give you a better understanding of the process.
How Long Does Professional Basement Waterproofing Last?
A properly installed system, like a cavity drain membrane, is engineered to last for the entire lifespan of your property. You'll find most specialist installations come with a 10 to 30-year guarantee for complete peace of mind.
Of course, the system's longevity relies on looking after its key components. With simple annual maintenance, particularly for the sump pump, your basement should stay protected from water indefinitely. This long-term reliability is precisely why a professional installation is worth the investment.
Should I Tackle This Myself or Hire a Professional?
While applying a coat of waterproof paint or filling a minor crack might seem like a straightforward DIY task, installing a comprehensive waterproofing system is a different beast entirely. It's a complex job that's best left to certified specialists. Get it wrong, and you could be facing far more extensive and costly damage down the line.
A professional can accurately diagnose the true source of the water ingress and, crucially, will provide an insured guarantee for their work. This is essential not just for protecting your home's value but for ensuring the solution is effective and permanent.
What’s the Difference Between Damp Proofing and Waterproofing?
This is a really important distinction to grasp. Damp proofing is a specific treatment designed to stop moisture from the ground rising up into your walls—what's commonly known as rising damp. It isn’t designed to hold back water that’s under pressure.
Waterproofing, on the other hand, is a much more robust solution. It’s engineered to protect against hydrostatic pressure, which is the force of groundwater in the surrounding soil actively trying to push its way through your basement walls and floor. For any space below ground level, this higher level of protection is absolutely vital to keep it completely dry.
At Harper Latter Architects, we specialise in integrating high-performance waterproofing into bespoke residential designs, ensuring every part of your home is beautiful, functional, and secure. Discover how we can transform your vision into a timeless reality at https://harperlatterarchitects.co.uk.
Comments