
UK Planning Permission Process: A Practical Guide
- Harper Latter Architects

- Oct 11, 2025
- 15 min read
Updated: Oct 13, 2025
Before you even think about stone samples or colour palettes, the very first hurdle in any high-end residential project is the planning permission process. It all boils down to one crucial question: do your plans need formal council approval, or can they proceed under a set of pre-approved works known as Permitted Development Rights?
Do You Actually Need Planning Permission?

Before diving headfirst into detailed architectural drawings and lengthy application forms, you need to work out which path your project has to follow. Getting this right from the outset can save an incredible amount of time, stress, and money.
The core distinction is between projects that need a full planning application and those that can proceed under Permitted Development Rights (PDR).
Think of PDR as a kind of national grant of planning permission, given by Parliament rather than your local council. It allows for certain types of work to be carried out on your home without needing to apply for planning permission, as long as you stick to a very strict set of rules. It’s a common route for smaller, more straightforward projects.
Permitted Development vs Full Planning
So, what's the difference? It usually comes down to scale, location, and the overall impact of the work. A modest, single-storey rear extension that doesn't push out too far from the original house might be fine under PDR. On the other hand, an ambitious two-storey side extension that dramatically changes how the property looks will almost certainly require a full planning application.
Here are a few common scenarios we see all the time:
A Simple Garden Room: Often, a garden outbuilding for incidental use (like a home office or gym) can be built under PDR, provided it meets specific height and size limits. For a deeper look, check out our detailed [UK garden room planning permission guide](https://www.harperlatterarchitects.co.uk/post/uk-garden-room-planning-permission-guide).
A Loft Conversion: Many loft conversions fall under PDR, but if you want to add a dormer to the front of the house or go beyond the volume limits, you’ll be pushed into needing a full application.
A Large Extension: Any extension that is more than half the width of the original house, is higher than the existing roof, or includes a balcony or veranda will need full planning permission. No question.
It's a common misconception that PDR is a free-for-all. The rules are incredibly specific about dimensions, materials, and how close you can build to your boundaries. Always double-check the latest regulations, as they do change.
The Importance Of Your Local Plan
Even if your project seems to fit neatly within national PDR guidelines, local rules can throw a spanner in the works. Every local authority has a Local Plan, a critical document that sets out the vision and policies for future development in the area.
This document is your guide to what the council finds acceptable. It covers everything from design standards to environmental protection, and it can contain specific policies that restrict or completely remove certain Permitted Development Rights. This is especially common in designated areas like:
Conservation Areas
Areas of Outstanding Natural Beauty (AONBs)
National Parks
World Heritage Sites
And if your property is a listed building, you can forget PDR entirely. You'll need Listed Building Consent for almost any work, inside or out.
Your council's website will have the Local Plan available, and reading it early on is non-negotiable. Understanding these local nuances helps shape a design that aligns with the council's expectations from day one, which dramatically improves your chances of a successful outcome if you do need to submit a full application.
Building a Bulletproof Planning Application

Once you’ve established that a full planning application is the route forward, the next phase is all about building a compelling case for your project. A strong submission isn't just a box-ticking exercise; it’s a persuasive argument that shows how your vision enhances the property while respecting its context. Getting this stage right is crucial for a smooth ride through the planning system.
Think of your application as the story you're telling the planning officer. It needs a clear narrative, supported by precise evidence and professional documentation. Simply submitting basic drawings won’t cut it, especially for high-end residential projects where every detail is scrutinised.
The Non-Negotiable Core Documents
At the heart of every application are the architectural drawings. These need to be technically perfect, showing existing and proposed floor plans, elevations, and site layouts. They are the factual bedrock of your proposal, so accuracy is everything.
Alongside the drawings, the Design and Access Statement is your chance to bring the project to life. This is the written document where you explain the thinking behind the design. It should cover:
The Rationale: Why is the project needed? How does it solve a problem or meet your family’s needs?
The Context: How does your design respond to the local area, neighbouring properties, and the character of the street?
The Materials: What materials will you use, and why have you chosen them to complement the existing building and its surroundings?
Access: How will everyone access the property, including those with mobility issues?
This statement is what elevates your drawings from a technical exercise into a considered architectural proposal. For more complex schemes, you may need a deeper dive into the planning rules, which is something our detailed **UK house extension planning permission guide** covers extensively.
Think Like a Planner to Get Ahead of Objections
The most successful applications are those that anticipate and address potential concerns before the council even has a chance to raise them. A planning officer's job is to weigh your proposal against local and national policies, considering its impact on neighbours and the wider environment.
By putting yourself in their shoes, you can proactively tackle common issues. For instance, if your property has significant trees, commissioning a professional arboricultural survey from the outset shows you’re taking your responsibilities seriously. Likewise, a daylight and sunlight assessment can pre-emptively counter any concerns from next door about loss of light.
The goal is to submit an application that leaves no unanswered questions. By providing all the necessary information upfront, you reduce the likelihood of requests for more information, which can cause significant delays.
The planning system is also constantly shifting. Permitted development rights (PDRs), for example, have a huge impact on what requires a full application versus a simpler prior approval notice. In recent years, we've seen a definite trend towards granting more permissions under PDRs, which has contributed to the overall increase in granted applications nationally. It’s always worth looking at the latest official statistics to understand these currents.
Using Pre-Application Advice to Your Advantage
One of the most powerful tools in your arsenal is the formal pre-application advice service offered by most local councils. For a fee, you can present your initial designs to a planning officer and get direct, confidential feedback before you commit to a full submission.
This is an invaluable opportunity to gauge the council's reaction to your plans. The officer might flag potential policy conflicts you hadn't spotted or suggest design tweaks that would make the proposal more palatable. This early dialogue really helps to de-risk the entire process.
Engaging with pre-application advice demonstrates a collaborative approach, which is always viewed favourably. It shows you’re willing to work with the local authority to achieve a positive outcome. While it doesn't guarantee approval, our experience shows that projects which have been through pre-application advice have a significantly higher success rate. It's an investment that pays dividends by helping you craft an application that’s already aligned with what the planners are looking for.
Submitting Your Application Without The Headaches
With your robust application pack finally assembled, it’s time for the formal submission. This is the moment your plans move off the drawing board and into the official system. While it feels like a simple administrative step, getting it wrong here can lead to frustrating and completely avoidable delays.
Almost every application these days is submitted online through the Planning Portal, a national system that sends your documents to the correct local council. It's designed to be fairly intuitive, but as with anything in this process, the devil is in the detail. Before hitting that ‘submit’ button, a final, meticulous check of every single file is non-negotiable.
Passing The Critical Validation Stage
Once submitted, your application doesn’t go straight to a planning officer. First, it has to pass the validation stage. This is a purely administrative review by the council’s technical team to ensure you’ve included everything the law requires.
Think of it less as an assessment of your design and more as a simple tick-box exercise. Is every document present? Is the fee correct? If the answer to any of their checks is no, your application will be deemed 'invalid'. This sends you right back to the start, usually with a vague email, and the crucial 8-week decision timeline won't even begin until you've fixed the issue and resubmitted.
This infographic shows just how early this crucial check happens in the overall timeline.
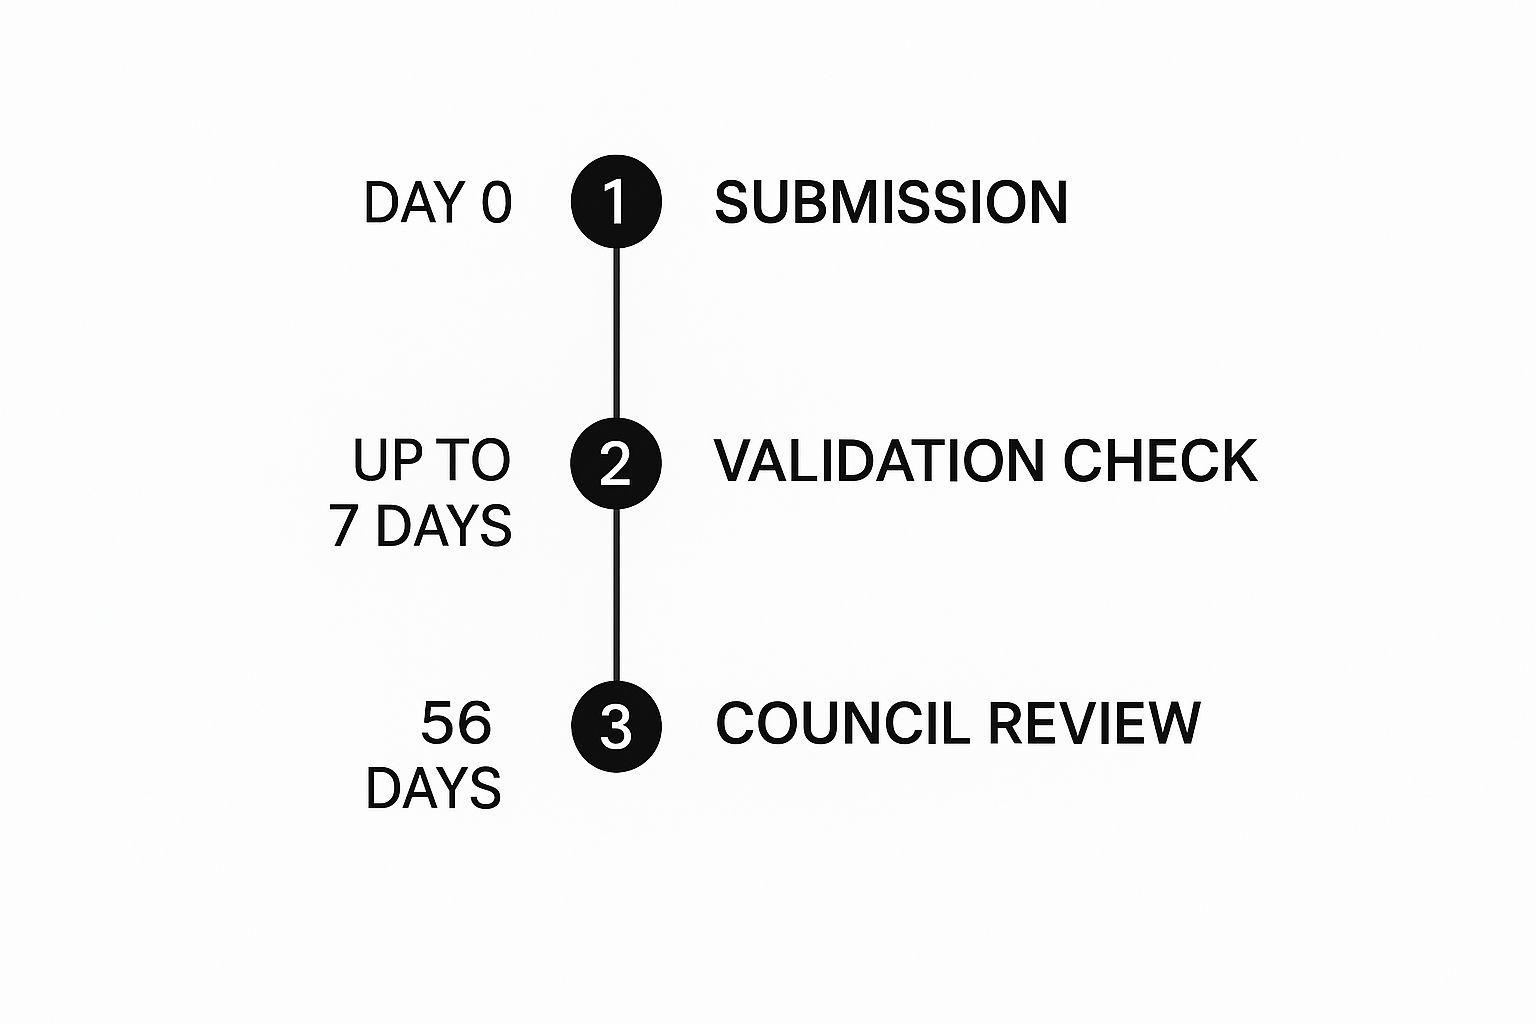
As you can see, this initial period is short but absolutely vital. Failing here stalls the entire process before it’s even properly begun. Getting it right means your application moves smoothly from ‘submitted’ to ‘under consideration’.
Common Validation Pitfalls To Avoid
From our experience, most applications are invalidated for simple, entirely preventable reasons. By knowing what to look out for, you can make sure your submission sails through the first time.
Here are some of the most frequent slip-ups we see:
Incorrect Fees: The application fee must be calculated perfectly and paid promptly. The safest bet is to use the Planning Portal’s own fee calculator to get the right figure.
Ownership Certificates: You must fill out the correct ownership certificate, declaring who owns the property and serving notice to any other owners if needed. This is a common and serious error.
Inconsistent Drawings: All drawings must be to a recognised scale (like 1:50 or 1:100), with a scale bar clearly shown. Critically, your proposed plans must be perfectly consistent across all drawings – the floor plans have to match the elevations.
Missing Site Location Plan: You absolutely must include a site location plan with the property boundary outlined in red and any other nearby land you own outlined in blue. This has to be based on an up-to-date Ordnance Survey map.
Getting your application validated on the first attempt is a key milestone. It confirms your submission is officially registered and the statutory 8-week clock has started ticking. A smooth validation sets a professional and competent tone for the rest of the process.
Successfully passing validation is all about demonstrating thoroughness. By methodically checking these details, you prevent bureaucratic hurdles from slowing down your project, allowing the planning officer to focus on the quality of your design, not the quality of your paperwork.
What Happens While You Wait For A Decision?

So, your application is in and validated. What now? This kicks off the standard eight-week countdown to a decision. Far from being a quiet waiting game, this period is a dynamic phase where your proposal is opened up to public and professional scrutiny. Understanding what’s going on behind the scenes is key to navigating this crucial stage.
First up is the public consultation period. Your local council will now publicise your application. You’ll see a notice go up near your property, your plans will appear on the council's website, and letters will be sent to your immediate neighbours. This gives everyone a statutory period, usually 21 days, to view your proposal and submit their comments.
This is often the most nerve-wracking part for homeowners. It’s when objections can surface, and it’s important to remember that while anyone can comment, only 'material planning considerations' will carry any real weight with the council.
Navigating Public and Professional Consultations
So, what exactly are material considerations? They are specific, planning-related issues that a case officer can legally take into account. Objections based on a personal dislike of the project or a potential loss of property value simply aren’t considered material and will be disregarded.
Valid grounds for objection, however, tend to focus on genuine impacts:
Overlooking and Loss of Privacy: Concerns that a new window or balcony will directly look into a neighbour’s home or garden.
Loss of Light or Overshadowing: How your proposal might significantly reduce the natural light reaching a neighbouring property.
Parking and Highway Safety: The impact on traffic, access, and on-street parking, which is a big issue in congested areas.
Design and Appearance: Whether the proposal is out of character with the existing house or the wider street scene.
It’s not just neighbours who have a say. The council will consult various statutory bodies whose opinions carry significant weight. For a high-end residential project, this could involve the Highways Agency if you're altering an access point, the Environment Agency if there's a flood risk, or the council's own conservation officer if your property is in a Conservation Area.
Building a Relationship with Your Case Officer
During this period, your application will be assigned to a planning case officer. This individual is your primary point of contact at the council. They are responsible for assessing your proposal from top to bottom and writing the final report that recommends either approval or refusal.
Establishing a professional, constructive relationship with them is hugely beneficial. You shouldn’t bombard them with calls, but a polite introductory email to confirm they have everything they need can set a really positive tone. If significant objections are raised, you or your architect can ask for their perspective. Sometimes, a minor design tweak, suggested in dialogue with the officer, is all it takes to resolve a major concern.
An open line of communication is invaluable. We often find that a willingness to make small, reasonable amendments shows the planning officer you are acting in good faith, which can make all the difference in borderline cases.
It’s worth remembering that the UK's planning system handles a vast number of applications. To give you some context, in the second quarter of 2025 alone, 80,800 applications were decided upon in England, with around 88% being granted. This high approval rate often reflects the detailed work and collaborative approach taken during the application process. You can find more details in the government's latest planning application statistics.
The table below breaks down what this eight-week period typically looks like in practice.
Key Stages of the Planning Application Timeline
Stage | Typical Duration | Key Activities |
|---|---|---|
Validation & Registration | Week 1 | Application is checked, registered, and a case officer is assigned. |
Public Consultation | Weeks 1-4 | Site notices are posted, neighbour letters sent out. 21-day public comment period begins. |
Consultations & Site Visit | Weeks 3-6 | The case officer consults statutory bodies and conducts a site visit to assess the proposal in person. |
Assessment & Officer's Report | Weeks 5-7 | All comments and policies are reviewed. The officer writes their report with a final recommendation. |
Decision | Week 8 | The final decision is issued, either under delegated powers or by the planning committee. |
This timeline is a guide, but it shows just how many moving parts are involved after you click 'submit'.
The Officer Report and The Final Decision
Once the consultation period ends, the case officer's real work begins. They collate all the feedback, assess your plans against the Local Plan policies, and factor in observations from their site visit. All of this is compiled into a detailed officer's report, which concludes with a formal recommendation: approval or refusal.
So, who makes the final call? The path forward depends on the complexity and contentiousness of your application. The different UK planning application stages usually culminate in one of two ways.
The vast majority of straightforward applications (over 90%) are decided under 'delegated powers'. This simply means the head of the planning department authorises the decision based on the case officer's recommendation, without it needing to go any further.
However, if your project receives a significant number of valid objections or is particularly large or controversial, it may be referred to the planning committee. This is a formal meeting of elected local councillors who will hear arguments from the planning officer, objectors, and you (or your architect) before voting on the outcome. This is a much more public and political forum, where having a well-prepared and persuasive case is absolutely essential for success.
Managing The Outcome: Approval or Refusal
After weeks of waiting, the decision letter finally arrives. This moment marks the end of one phase but the beginning of the next, and whether it’s good news or bad, the letter is your roadmap for what to do next. It’s not just a simple ‘yes’ or ‘no’—it's a set of instructions.
Getting an approval is, of course, a huge relief. But before you pop the champagne, it's absolutely critical to read the entire decision notice, word for word. It's incredibly rare for permission to be granted without some strings attached. Almost every approval comes with a list of planning conditions, which are legally binding requirements you have to fulfil.
These conditions are the council’s way of making sure the development is built exactly as approved and that any potential knock-on effects are kept in check. They are a non-negotiable part of the planning permission process.
What To Do When Your Application Is Approved
An approval notice isn't a green light to start digging foundations tomorrow. First, you and your architect need to get to grips with the conditions attached to it. They usually fall into a few distinct categories, and each has its own timeline and demands.
You'll typically encounter conditions like these:
Pre-commencement Conditions: These are the big ones. They are specific tasks you must complete and have formally signed off by the council before a single spade hits the ground. A classic example is submitting physical samples of your proposed external materials—like bricks, slates, or window frames—for the planning officer's approval.
Pre-occupation Conditions: As the name suggests, these need to be sorted before anyone can officially move in or use the new space. This might involve finishing off landscaping schemes or ensuring new access routes are completed as planned.
Compliance Conditions: These are ongoing rules you have to follow during the build and sometimes even after. A common one is restricting construction working hours to keep the peace with your neighbours.
To get these ticked off, you’ll need to submit what’s called a 'Discharge of Conditions' application for each relevant point. This involves sending the council the necessary information (like material specifications or a landscaping plan), which they then formally approve in writing. Be warned: failing to discharge pre-commencement conditions before you start work can render your entire planning permission invalid.
It's a common and costly mistake to overlook the conditions attached to an approval. Make sure you budget for both the time and the professional fees required to discharge them properly. Ignoring them can lead to council enforcement action, which could stop your project in its tracks.
How To Handle A Planning Refusal
Getting a refusal can feel like a punch to the gut, but it is rarely a dead end. The decision notice will clearly state the specific planning policies the council believes your project breaches. This feedback, however disappointing, is gold—it’s your guide to figuring out the next move.
Your first port of call is to sit down with your architect and dissect the reasons for refusal. Are the issues fundamental design flaws, or are they smaller points that can be ironed out? This conversation will determine which of the two main paths you should take.
The first option is to go back to the drawing board and negotiate. Your architect can open a dialogue with the planning officer to see if a tweaked design could win them over. If the sticking points are things like the overall scale being a touch too large or a window creating a privacy issue, submitting a revised application is often the fastest and most sensible route.
The second path is to appeal the decision. If you and your team genuinely feel the council has made an unfair or incorrect decision, you have the right to take your case to the Planning Inspectorate. This is an independent government body that will review the entire application from a completely fresh perspective.
You have a strict 12-week deadline from the decision date to lodge an appeal for a householder application. The process is usually handled through written statements, where your architect or a planning consultant crafts a robust argument against the council’s refusal reasons. An inspector weighs up both sides before making a final, binding decision. While it can take several months, an appeal gives you a fair shot at overturning a decision you believe is unjust.
Answering Your Planning Permission Questions
Navigating the UK planning system can feel like learning a new language, filled with jargon and procedural quirks. To cut through the noise, here are some straightforward answers to the questions we hear most often when working on high-end residential projects.
How Long Does The Planning Permission Process Really Take?
While the council has an official target to decide on your application within eight weeks (or 13 weeks for more complex schemes), that's only the final leg of the journey. Don't mistake that for the whole timeline.
Before you even submit, you'll need weeks—sometimes months—to prepare high-quality architectural drawings, commission specialist surveys, and pull together a compelling application pack. If your approval then comes with 'pre-commencement conditions', you'll need to get those signed off before a spade can hit the ground. Realistically, from the first sketch to starting construction, you should set aside anywhere from six to nine months.
What Is The Difference Between Planning Permission And Building Regulations?
This is a critical distinction, and one that trips up a lot of homeowners. They are two completely separate approvals, handled by different departments, and you will almost certainly need both.
Think of it like this:
Planning Permission is all about the principle of what you want to build. It looks at the project's size, appearance, and its impact on your neighbours, the street, and the wider area.
Building Regulations are about how you build it. They cover the technical side of things—structural safety, fire precautions, drainage, energy efficiency, and ventilation.
Even if your project is small enough to fall under Permitted Development rights (meaning no planning permission is needed), you'll still need Building Regulations approval to ensure it's built safely and to the correct standards.
The simplest way I explain it to clients is this: planning permission is the council agreeing with the idea of your extension. Building Regulations approval is the technical sign-off that the construction itself is safe and up to scratch.
Can I Change My Design After Getting Permission?
It’s completely normal for ideas to evolve as a project develops, but you can’t just make changes on the fly once permission is granted. Any deviation from the approved plans needs to be handled formally.
For a very small tweak—like shifting a window on a non-critical wall—a 'Non-Material Amendment' application is usually enough. It's a relatively quick and low-cost process.
For something more noticeable, like changing the brickwork or altering the roof profile, you'll probably need to apply for a 'Variation of Condition'. If the design changes significantly, however, you may have to submit a brand-new planning application. The golden rule is to always discuss potential changes with your architect first, so you can approach the council in the right way and avoid any risk of enforcement action.
How Much Does A Planning Application Cost?
The statutory fee you pay to the council is set by the government. Right now, a standard householder application for an extension in England will cost you £206.
But that fee is just the tip of the iceberg. The real investment is in the professional expertise needed to give your application the best chance of success. Your budget needs to account for the architectural drawings, planning statements, and any specialist reports required, like tree, ecology, or heritage surveys. These costs can easily run into several thousand pounds, depending on the scale and complexity of your home.
Navigating the complexities of high-end residential projects is what we do best. At Harper Latter Architects, we guide clients through every stage of the planning permission process to realise their vision. Explore our bespoke architectural services to see how we can bring your dream home to life.
I like how you tackled this topic with clarity and objectivity. The issue of online entertainment platforms is relevant and up to date. For those interested, further information is available at . It's fascinating to see such thorough coverage on digital innovations.