
Design kitchen extension: The Ultimate UK Guide
- Harper Latter Architects

- 4 days ago
- 17 min read
Before a single line is drawn, the most critical part of any kitchen extension is nailing down your ‘why’. This is a huge investment in both time and money, so getting absolute clarity from the very beginning isn't just a good idea—it's non-negotiable.
This isn't about flicking through catalogues and picking out cabinets just yet. It's a much deeper dive into how your household really works, day in and day out.
Defining Your Vision for a Kitchen Extension
The best place to start is with what you currently have. Take a long, hard look at your existing kitchen. What are its biggest failings? Maybe it’s the constant battle for worktop space, the gloomy light that makes cooking a chore, or a cramped layout that cuts you off from family and guests.
Pinpointing these frustrations is the first step toward designing a space that actually solves them.
Articulating Your Practical Needs
Think about your daily routines. How should this new space make your life easier? Are you a serious cook who dreams of a high-performance "chef's paradise," or is your kitchen more of a social hub for homework, casual dinners, and catching up over coffee?
To help build your brief, ask yourself some key questions:
Functionality: Do you need a proper walk-in pantry, a dedicated utility area to hide the laundry away, or a simple breakfast bar for quick meals?
Socialising: Will the space be used for hosting big gatherings? If so, you'll want to think about an open-plan layout that flows effortlessly into a dining or living area.
Family Life: How will the kids use the room? Your design could incorporate durable surfaces, a small homework nook, or easy, safe access to the garden.
Must-Haves: What are your absolute non-negotiables? This could be anything from a huge kitchen island to bi-fold doors that open up the entire back of the house.
Kitchen extensions are consistently one of the most popular home improvement projects in the UK, tapping into the trend for multi-functional living spaces. In fact, research shows that over 40% of UK homeowners who are renovating choose to extend their kitchens rather than just update the existing room.
The open-plan kitchen extension is a firm favourite, with many people knocking down internal walls to create big, airy kitchen-diner-living zones that feel much more connected. You can explore more about top kitchen extension trends to see just how popular these choices have become.
Creating a Visual Mood Board
Once you've got a handle on the practicalities, it's time for the fun part: the aesthetics. And for this, a mood board is an absolutely invaluable tool. It’s simply a visual collection of images, textures, and colours that captures the look and feel you're aiming for.
A mood board isn't just a collection of pretty pictures. It's a communication tool that translates your abstract ideas into a clear, visual language for your architect and design team, ensuring everyone is aligned from day one.
Use platforms like Pinterest or even just gather physical samples of materials that catch your eye. Your mood board should cover everything from the style of cabinetry and the type of worktop to flooring, light fittings, and the overall colour palette.
This visual brief is fantastic for preventing misunderstandings and helps your architect bring your vision to life far more accurately, saving a lot of time and potential redesign costs down the line.
Choosing the Right Type of Kitchen Extension
Once you have a clear vision for what you want, it's time to get into the nuts and bolts of how to build it. The type of extension you choose will fundamentally shape your new kitchen, influencing everything from the internal layout to how natural light fills the space. Your decision will hinge largely on your property type – whether it’s a classic Victorian terrace, a 1930s semi, or a modern detached house.
Making the right choice here is absolutely critical. This isn’t just about adding square footage; it's about adding the right kind of space that genuinely improves how you live. Let’s break down the most common options to help you figure out what’s best for you.
Side-Return Extensions
A side-return extension is a hugely popular choice, especially for Victorian and Edwardian terraced houses. These properties often have a narrow, gloomy alleyway (the 'side return') running alongside the back of the house. By filling in this often-neglected space, you can transform a cramped, dark galley kitchen into something much wider and brighter.
This approach is fantastic for squaring off the back of your house. It creates a far more functional, open-plan area without having to sacrifice any of your precious garden.
Best For: Terraced or semi-detached properties that have an existing side return.
Pros: Significantly widens your ground floor, brings in a lot more light, and makes brilliant use of otherwise dead space.
Cons: Construction can be disruptive as it almost always involves a party wall. The width of the extension is also naturally limited by the space you have.
Rear Extensions
A rear extension is probably the most straightforward option on the table. It involves building directly out from the back of your property, extending into the garden. This type is incredibly versatile and can be designed as a single or even a double-storey addition, depending on your needs and what local planning rules allow.
This is the perfect way to forge a seamless connection between your home and garden. By incorporating large glazed doors, like bi-folds or sliding panels, you can flood the new space with light. For many homeowners, a homeowner's guide to modern glass extensions is a great place to start for inspiration on creating that incredible link to the outdoors.
Wrap-Around Extensions
If you're after the ultimate transformation, a wrap-around extension is the answer. It combines both a side-return and a rear extension into one L-shaped structure, creating a substantial new area that gives you incredible flexibility for your kitchen design. You can easily create distinct zones for cooking, dining, and relaxing.
This option can completely change the dynamic of your ground floor, turning a series of smaller, separate rooms into a spectacular, light-filled family hub.
A wrap-around extension gives you the most significant increase in living space and value, but it's also the most complex and costly to build. It requires very careful structural planning and is more likely to need full planning permission.
Key Structural Considerations to Keep in Mind
No matter which type of extension you’re leaning towards, there are some fundamental structural elements you’ll need to get your head around. These aren't just technical details for your builder; understanding them helps you appreciate the true scope and cost of the project from the get-go.
Steel Beams (RSJs): To get that beautiful, open-plan feel, you'll need to remove existing external walls. Rolled Steel Joists (RSJs) are the structural supports that make this possible, safely bearing the load of the floors above.
Foundations: Every new structure needs solid foundations. The depth and type required will depend entirely on your local ground conditions and the proximity of any large trees. This will be specified by a structural engineer.
Party Wall Agreements: If your extension is being built up to or on the boundary with a neighbour, you will legally require a Party Wall Agreement. This is a non-negotiable process that protects both you and your neighbours. It's vital to get this started early in the design phase to avoid frustrating delays later on.
Mastering Kitchen Layout and Ergonomic Flow
The structural shell of your extension is just the beginning. It's the internal layout that truly transforms it into the living, breathing heart of your home. Getting the layout and flow right is probably the most critical part of the entire design process. It doesn’t just dictate how the space looks, but how it feels and functions day-to-day, preventing those little frustrations that can build up over time.
A well-considered design goes far beyond just placing cabinets and appliances. It’s about crafting a space that feels intuitive, comfortable, and is a genuine pleasure to use—whether you're tackling a complex recipe or just making a quick cup of tea.
This is where the principles of ergonomics come into play. A great kitchen layout minimises unnecessary steps, keeps your essential tools within easy reach, and creates a safe, efficient environment for everyone.
The Classic Working Triangle
For decades, the "working triangle" has been a cornerstone of kitchen design theory. The concept is simple: the three main work areas – the sink, the hob, and the refrigerator – should form a logical triangle. The idea is to keep the distance between these points short and unobstructed, making the cooking process as seamless as possible.
While it's still a really valid principle, modern kitchens often have to do so much more than just cooking, which has led to an evolution of this classic idea.
Modern Kitchen Zoning
These days, we often think in terms of "zones." This approach is particularly brilliant in larger, open-plan kitchen extensions where multiple activities might be happening at once. Instead of being constrained by a single triangle, you create dedicated areas for specific tasks.
Preparation Zone: This needs plenty of clear worktop space. Ideally, it should be located between the sink and the hob, with easy access to bins and compost caddies.
Cooking Zone: Centred around the hob and oven, this area should feature heat-resistant surfaces and have nearby storage for all your pots, pans, and utensils.
Cleaning Zone: This zone houses the sink and dishwasher. It’s always a good idea to have your waste and recycling bins integrated here to make clearing up a breeze.
Social Zone: In an open-plan design, this could be a kitchen island with bar stools or a nearby dining table. It creates a spot for guests and family to gather without getting under the cook's feet.
Storage Zone: This covers the fridge-freezer and any pantry or larder units, keeping all your food supplies organised and in one convenient place.
Planning your layout around zones rather than just appliances ensures every part of your kitchen has a clear purpose. This approach is fundamental to creating a space that feels organised and effortless to use, even during the busiest family moments.
Choosing a Layout for Your Extension Type
The shape and size of your new extension will naturally nudge you towards certain layout choices. Some layouts are perfect for long, narrow spaces, while others really shine in wide, open-plan areas.
Before you get your heart set on a specific layout, it's vital to have a clear understanding of the architectural plans. Our practical guide on UK plans for kitchen extension breaks down the kind of drawings and information you'll need from your architect to make these crucial decisions.
The infographic below illustrates the most common extension types, which heavily influence these layout decisions.
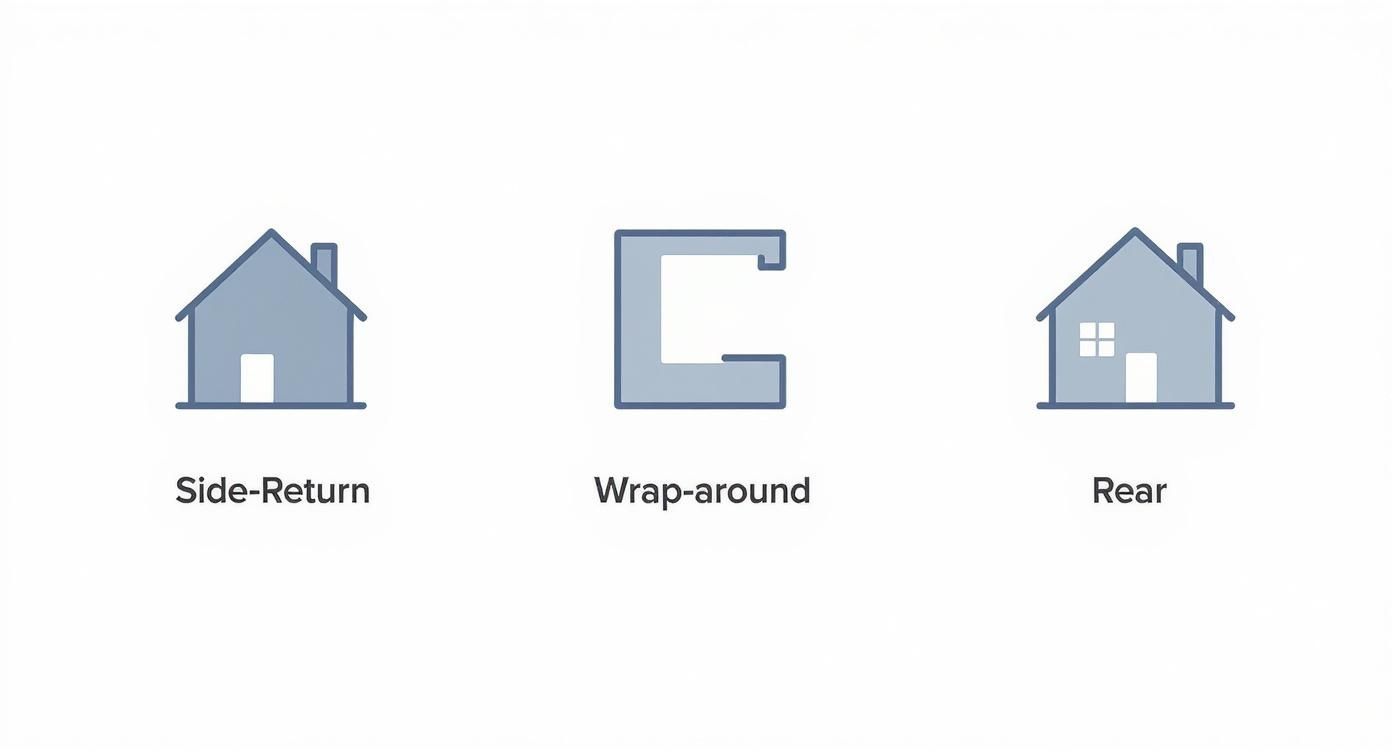
As you can see, whether you opt for a side-return, wrap-around, or rear extension will create a completely different footprint, with each one lending itself to particular internal configurations.
Popular Layout Configurations
Let's dive into the most common layouts and see where they work best.
Kitchen Layout Comparison for Different Extension Types
Choosing the right layout is a balancing act between the physical constraints of your extension and the way your family lives. The table below compares the most popular options to help you see which might be the best fit for your project.
Ultimately, the best layout is the one that feels most natural to you. Think about your daily routines and what currently frustrates you about your existing kitchen—that's often the best starting point for designing a space that truly works.
A bit more on each:
The Galley KitchenA galley layout features two parallel runs of units, creating a central corridor. This is an incredibly efficient setup—often favoured by professional chefs—and can be a fantastic solution for narrower side-return or rear extensions where every inch counts.
The L-Shape KitchenThis popular layout uses two walls in a corner, which naturally opens up the remaining space for a dining table or a small seating area. It’s a wonderfully sociable arrangement, perfect for extensions where you want to blend cooking, dining, and family life.
The U-Shape KitchenBy using three walls, a U-shape layout offers a tremendous amount of worktop and storage space. It’s an ideal choice for larger extensions and is a dream for keen cooks, as it wraps around you, keeping everything close at hand. The only catch is ensuring the space is wide enough to avoid feeling boxed in.
The Island KitchenAdding a kitchen island is easily one of the most requested features in a modern extension. An island is a true multi-tasker, providing extra worktop space, storage, seating, and can even house a hob or sink. It creates a natural focal point in an open-plan room for both cooking and socialising. Just remember the golden rule: an island works best in larger layouts where you have plenty of room to move around it. You should aim for at least 1 metre of clearance on all sides.
Budgeting Realistically for Your Kitchen Extension
A beautiful vision and a perfect layout are exciting, but it’s your budget that will make or break the project. Getting your finances in order from day one is the bedrock of a stress-free kitchen extension. A realistic, transparent plan prevents nasty surprises down the line and helps you decide where to splash out and where to save.
First things first, you need a solid grasp of the costs here in the UK. The final price tag on a kitchen extension is a mix of its size, complexity, your location, and the quality of finishes you choose. It makes sense that a simple rear extension will cost less than a more structurally ambitious wrap-around design, for example.
Breaking Down the Core Costs
It’s a classic mistake to only think about the builder and the kitchen units. In reality, the total project cost is made up of several key parts, and you need to account for every single one.
Professional Fees: This is what you pay your architect, structural engineer, and maybe a party wall surveyor. They’re absolutely essential for a well-designed, legally sound project and usually make up 10-15% of the total build cost.
Administrative Costs: Think planning application fees or lawful development certificates, plus the cost of building regulations approval.
The Build (Shell): This is the big one. It covers everything from the foundations and brickwork to the roof, structural steels, and making the new space completely watertight.
Glazing: The price of windows, skylights, and those lovely big glass doors (like bi-folds or sliding systems) can vary hugely. This will be a significant line item on your spreadsheet.
Internal Fit-Out: This bucket includes all the plumbing, electrics, plastering, flooring, and decorating.
The Kitchen Itself: And finally, the main event! The cost of your cabinetry, worktops, appliances, sink, and taps.
Understanding the Numbers
To get a handle on your budget, it helps to think in terms of cost per square metre. In the UK, you can generally expect a single-storey kitchen extension to cost somewhere between £2,200 and £3,300 per square metre.
So, for a fairly standard 30m² extension, you could be looking at a build cost of around £82,500, excluding VAT. As a rule of thumb, the structural shell eats up about 60% of that, the internal fit-out takes 30%, and your professional fees cover the final 10%. For a deeper dive, you can build an accurate extension cost guide with our detailed breakdown.
The Costs People Forget to Budget For
Beyond the big-ticket items, a few "hidden" costs often catch homeowners out. Factoring these into your plan from the very start is the secret to staying on track.
Don't forget VAT. Make sure every quote you get from builders and suppliers clearly states whether VAT is included or not. At 20%, overlooking it can add a massive, unwelcome chunk to your final bill.
Other costs that are easy to miss include:
A Temporary Kitchen: You’ll be without a functioning kitchen for a few months. You need to factor in the cost of setting up a temporary one or just accept you'll be spending more on takeaways.
Landscaping: A new extension almost always means your garden will take a hit. Budget for putting things right, whether that’s re-turfing the lawn or building a new patio area.
Interior Decoration: It's not just about the paint. New furniture, blinds or curtains, and all the final decorative touches can add up surprisingly quickly.
The Contingency Fund: This one is non-negotiable. Always, always set aside 10-15% of your total build cost as a contingency. This is your safety net for any unforeseen problems that crop up during the build, ensuring a small issue doesn’t derail the whole project.
Selecting Finishes and Styling Your New Space

With the structural work done and the layout locked in, you get to move on to the really fun part. This is where you bring your kitchen extension to life, stamping your personality on the space through the finishes, fixtures, and overall styling.
These are the details that turn a well-built shell into the true heart of your home. The choices you make now define everything from the feel of the worktop under your hands to the way light bounces off the splashback. It’s all about creating a room that feels just right.
Choosing Your Core Materials
The surfaces in your kitchen are the backdrop to daily life, so they need to be both beautiful and incredibly hardworking. For every material you consider, think about three things: durability, maintenance, and how it looks.
Let’s break down the main players:
Worktops: Quartz is a go-to for good reason. It’s non-porous, tough as nails, and comes in a huge range of colours and patterns. If you love the unique, organic look of natural stone, granite and marble are stunning, but they do need sealing to keep stains at bay. For a warmer, more traditional feel, you can’t beat solid wood, though it does need a bit more TLC.
Flooring: Your floor needs to withstand a lot – heavy footfall, spills, dropped pans, you name it. Large-format porcelain tiles are a brilliant, hard-wearing option. For something a bit warmer and softer underfoot, Luxury Vinyl Tile (LVT) offers fantastic durability. A great tip for creating a seamless flow is to run the same flooring from the extension right through into the original part of the house.
Cabinetry: This is probably the biggest visual statement in your kitchen. Shaker-style doors are a timeless choice that works in both classic and contemporary homes, while flat, handleless doors give you that sleek, minimalist aesthetic. The finish you choose—whether it’s matt, gloss, or a painted wood grain—will have a massive impact on the room’s feel.
Splashbacks: This is your chance to inject a bit of personality. A single sheet of coloured glass is modern and a dream to clean. Metro or patterned tiles can add texture and create a real focal point. For a cohesive, high-end finish, another popular option is to continue your worktop material up the wall.
This desire for a beautiful, functional kitchen is a huge motivator for homeowners across the UK. In fact, recent research shows that around 30% of homeowners in the East of England are planning to invest in a new kitchen—the highest proportion in the country. It’s a trend we’re seeing everywhere, with plenty of homeowners in the South West, Wales, London, and Yorkshire also planning upgrades. You can discover more insights about these home renovation statistics to see how this is shaping property trends.
Mastering Your Lighting Scheme
Good lighting is a game-changer. It is absolutely essential in a kitchen extension, and a single light dangling from the middle of the ceiling just won't cut it. The secret is a layered scheme that combines different types of light to create a space that’s both functional and full of atmosphere.
Think of your lighting in three layers:
Ambient Lighting: This is your general, overall light. It’s usually provided by recessed downlights or spotlights dotted across the ceiling.
Task Lighting: This is the focused, bright light you need for getting jobs done. Think under-cabinet LED strips lighting up your worktops or targeted spotlights over the hob.
Accent Lighting: This is the decorative layer that adds mood and character. We’re talking about those gorgeous pendant lights over an island or dining table, or wall lights that highlight interesting features.
A well-designed lighting scheme should always be on a dimmer system. It gives you total control, letting you go from bright, functional light for cooking to a soft, ambient glow for entertaining at the flick of a switch.
Styling and Creating Cohesion
The final step is all about pulling everything together. You want a cohesive style that connects the new extension to the rest of your home, and you can achieve this with a considered colour palette, hardware choices, and furniture.
Start by picking a palette of two or three core colours and use them consistently. This doesn’t mean everything has to match perfectly, but using different tones from the same family will create a beautifully harmonious feel.
Hardware—the handles, knobs, and taps—is like the jewellery of your kitchen. Brass or bronze finishes can add real warmth and a touch of luxury, while matt black or stainless steel gives a more contemporary edge. Try to match your hardware finishes for a polished, intentional look.
Finally, choose furniture like dining tables, chairs, and bar stools that complement the style of your cabinetry and the architecture of the extension. This will ensure a seamless, natural transition between the old and new parts of your home.
Your Kitchen Extension Questions, Answered
Taking the leap on a kitchen extension is a big deal, and it's completely normal to have a head full of questions before you start. It can all feel a bit complex, but getting clear answers from the get-go will give you the confidence to move forward.
Here are a few of the questions we hear most often from homeowners planning their own projects.
Do I Need Planning Permission for a Kitchen Extension?
This is usually the first question on everyone's mind, and the honest answer is: it depends. The good news is that many straightforward kitchen extensions can be built under Permitted Development (PD) rights. This is a government scheme that allows you to build without needing to go through the full planning permission process, which is great for simpler single-storey rear extensions.
However, these PD rights come with a very strict set of rules. They dictate everything from the maximum size and height of your extension to how close it can be to your property boundaries. You will almost certainly need to apply for full planning permission if your project falls into any of these categories:
You're Exceeding Size Limits: Your design is bigger than what's allowed under Permitted Development.
You're in a Designated Area: Your home is in a conservation area, a National Park, or an Area of Outstanding Natural Beauty (AONB).
It's a Listed Building: Your property is listed, which means it's protected by its own set of very stringent regulations.
Your PD Rights Have Been Removed: Sometimes, a previous planning condition on your property (or the original development) has removed these rights.
It is absolutely crucial to check this with your local planning authority or your architect before a single spade hits the ground. Getting this wrong can lead to serious headaches and costly enforcement action.
How Long Does a Kitchen Extension Take to Design and Build?
Patience really is a virtue when it comes to home extensions. A realistic timeline, from that first spark of an idea to the finished, usable space, is usually somewhere between 6 and 12 months. This timeline naturally breaks down into two key phases.
First up is the design and planning stage, which can easily take 3 to 6 months on its own. This period isn't just about drawing pretty pictures; it covers initial surveys, architectural drawings, detailed structural calculations, and, of course, securing the necessary planning consent or a lawful development certificate.
Once you’ve got the green light, the construction phase for a typical single-storey extension will likely take another 3 to 5 months. This can vary depending on the complexity of the build, the availability of your builder, and any unexpected surprises that crop up on site.
What’s the Most Important Thing to Get Right in the Design?
While every detail plays its part, there are two elements that will fundamentally shape how you feel in your new space every single day: natural light and layout.
Getting the flow of natural light and the ergonomic layout right is non-negotiable. No matter how exquisite your finishes are, a gloomy, impractical space will always feel like a disappointment. Prioritising light and flow is an investment in your long-term happiness in the home.
A lack of natural light can make even the most generously sized extension feel claustrophobic and unwelcoming. You have to think carefully about the orientation of the build and the clever placement of windows, rooflights, and large glazed doors to pull in as much daylight as possible.
The layout is just as critical because it dictates how the space actually works. A poorly planned workflow, with the fridge miles from the hob or not enough worktop space, will be a source of daily frustration. A great layout, on the other hand, feels effortless and makes cooking, chatting, and relaxing a genuine pleasure.
Should I Hire an Architect or a Design and Build Company?
This decision really hinges on how complex your project is and how involved you want to be in the day-to-day process. Both routes have their own distinct advantages.
An architect offers a completely bespoke design service. They bring creative, out-of-the-box solutions, navigate the planning maze on your behalf, and can oversee the entire project from start to finish. This is the ideal route for more ambitious, unique projects or for anyone who wants a trusted expert managing the process.
A design and build company, in contrast, provides an all-in-one service under a single contract. This can simplify things and often proves to be a cost-effective option for more straightforward extensions. The trade-off might be slightly less design flexibility than you'd get with an independent architect. We always suggest meeting with both to see which approach feels like the right fit for your vision, budget, and personality.
At Harper Latter Architects, we specialise in designing beautiful, functional, and bespoke residential spaces that perfectly reflect our clients' lifestyles. From navigating planning complexities to perfecting the flow of your new kitchen, our experienced team is here to guide you through every step.
Discover how we can bring your vision to life by exploring our architectural services.
Comments